Showing posts with label should've done sunday. Show all posts

Sunday, August 28, 2011

Should've Done Sunday: Sofa Bear

This was the very first novelty cake I made. Well, that's not exactly true, because I did a practice cake first. I don't think I took any photos of it, and really, it was nothing to look at anyway. I didn't even bother to color the fondant, so it resembled a poorly formed igloo more than a teddy bear sofa.

I made this cake years ago for some friends who were having a house warming party. I stole the idea from a special "Kids' Party Cakes" insert in a British cake decorating magazine, and it looked like something I thought I could do. Please forgive the odd edges on the photos. They were in a scrapbook of sorts before being scanned in. Yes, these pictures are that old.
 
Anyway, here's what I was going for. You can see that the cake in the magazine is much more polished, but I think I came pretty close. Click the thumbnails for a larger view.
This is such a cute idea and super fun cake to make. However, if I had it all to do over again, there are a few things I would do differently.
  • I should've trimmed the cake so that the couch corners are nicely rounded. The ones on my cake are too square.
  • I'm better at piping dots now, but I have too many on the teddy's sofa and most--if not all--have peaks. 
  • I'm also better at ruffling fondant now, so the skirt around the bottom of my cake would look more like the one pictured in the magazine. 
  • I made my teddy bear too dark. You can barely see his eyes and nose. I actually think the one in the magazine is a little too light to sit on such a yellow sofa, but I think an in-between brown would look better.
  • I would have drawn the seams on the couch. I don't know why I didn't do this. I maybe didn't have the right tool or just forgot, but I think that's an important detail to include.
The nice thing about a cake like this is that it's easy, and the colors could be changed to suit the occasion. Originally intended as a kids party cake, mine was for a housewarming, and I think it would be a cute baby shower cake. The couch could even become a moses basket or a bassinet. If you have any thoughts as to how else this cake could be used or improved, please leave a comment letting me know.

Sunday, July 24, 2011

Should've Done Sunday: Fair Cakes

Several summers ago I participated in a few of the culinary arts competitions at our county fair, and I had a lot of fun making my entries. This year, the Williamson County Fair runs from August 5 - 13, and I highly encourage my students and other baking enthusiasts to enter. With so many classes and sub categories, there really is something for everyone, whether you like to make candy, bake bread, or decorate cakes.

Locals and anyone else interested can check out the full listing here: Culinary Arts. Please note that everything must be made "from scratch" EXCEPT for entries in the display classes, which includes the decorated cakes competition. Those cakes aren't going to be cut or tasted, so they can be made from a mix or decorated "dummy" cakes. Entries for Section 102: Cakes category accepted on Friday, August 5th from 8:00 - 11:00 a.m.

Just to relive past glories, Here are pictures of the cakes I entered last time, as well as a few ideas about how I could have made them better.

Pictured below left is a lemon chiffon cake that I was afraid would be too dry, so I had what I considered at the time to be a brilliant idea of pouring raspberry sauce on the top as a glaze. Except, I did something wrong when I made the sauce and it was WAY too thin. I look at this cake now, and it reminds me of that scene from a 1970's Stephen King horror film. It didn't win a ribbon, so maybe the judges saw the same thing. Still, I wonder how it tasted.

  
In the center is a yellow cake with raspberry filling and white chocolate icing. I decorated the top with fresh raspberries in a vine pattern. I'm not thrilled with the finished look, but I can't put my finger on why. Any suggestions? I know it's missing a bottom border, that was intentional, and it doesn't really need one on the top. I think the vines could be piped better with the raspberries more randomly arranged, or something.

My chocolate cake faired better, but man, piping those dark chocolate ganache roses was a pain. I have unusually cold hands, and even I had issues with the ganache going too soft. I think maybe a simple single string border piped in dark chocolate around the cake side would have finished this one better, but it still got a ribbon, I just can't remember which one. I think it was second place.
  
I totally forgot to add vanilla extract to my pound cake, a mistake I tried to remedy with a glaze, but it didn't work. And neither do those oversized white shells! What in the world was I thinking putting those there? I must have been worried about the cake sliding off of the board or something and thought those would help keep it in place.

Oh, and did you see that I have a couple of video tutorials posted now? Click on the "Videos" link above to see them. I welcome any and all feedback, so please tell me what you think and feel free to leave me a comment suggesting future videos.

Sunday, May 8, 2011

Should've Done Sunday: Mother's Day Debacle

Actually, I may have made this cake for a birthday, but I was trying to replicate the design of a Mother's Day cake pictured in one of my cake decorating books. It's one of the first cakes I covered in rolled fondant. I was living in the UK at the time and enrolled in a basic sugarcraft course, but I had only ever used buttercream or some other type of frosting to ice a cake, so this was totally new to me.

Rolled fondant has since become very popular over here in the States, but it's not as readily available. When I made this cake nearly 14 years ago, I covered it with Regal-Ice, which I bought (comparatively cheaply) from the local grocery store. Here in the US, we have to either order off the internet or go to specialty cake decorating supply stores to get decent rolled fondant. I don't know if we'll ever see tubs of Satin Ice on the shelves at Publix.
Anyway, for this cake, not only was I a rolled fondant beginner, but I obviously had no clue what I was doing with the piping either. I vaguely recall just kind of making it up as I went along. Not that there's anything wrong with that, but this is another picture that makes me cringe. However, I had a lot of fun decorating this cake, and I think I was at least minimally proud of it at the time, and that's ultimately what matters. Like with art, I believe it's more about the process than the product. Especially when you consider that unlike art, in cake decorating the product gets eaten.

Oh, and I apologize for the poor picture quality. I made this cake long before I had a digital camera, so these are old fashioned, had-to-get-the-film-developed photos. At some point I thought them worthy to be included in my cake scrapbook, hence the awkward cropping. To post here, I had to use a scanner, and unfortunately, they came out a bit crooked and washed out.

This Should've Done Sunday cake has a small cluster of hand molded sugarpaste roses in the center. They're brushed, rather ineptly, with petal dust for color. Along the sides of the cake are some blossoms I made using my plunger cutters, and they also divide sections of the top border. I'm not sure what I was thinking with that. I was apparently trying to so some sort of overpiping, but I have no clue why I chose those colors. It also looks as though the icing is too thin, or something. The bottom border is the result of me trying to make shells before I knew how to make shells. I then topped off the uneven mess with stars. There was some space left on the cake board, so I filled it in with blobs. I guess I didn't feel like it was really cake decorating unless I squeezed a lot of icing out of a bag.

Just for comparison, here's what I was going for.
Obviously the colors on mine are all wrong, and I had no idea how to make fondant swags or bows, so I opted for overly-busy mystery borders. The cake pictured in the book is simple, and much more elegant than the one I made. Here's what I should've done with mine:
  • Used only one or two colors. I don't know why there's such a mess of mismatched hues, unless I was struggling with matching the icing colors, which is why you always need to color enough icing to do the job. If you run out, trying to match that exact color is a nightmare. 
  • Left off the top border. You can't really tell in the picture, but the edge is crimped, and then there's a mess of piping on top of that. I'd still do the crimping, but that's all.
  • The blossoms on the side are fine, but to make it look more like the cake from the book, I should've had more of them in a continuous swag.
  • The bottom border needs to be smaller and simpler. Properly made shells or a bead border would work, but without the irregular and uneven row of stars on top.
  • The weird pink blobs with green stars in between need to disappear.
I think there were a few wrinkles in the fondant along the bottom of the cake, which is why I piped so much of a bottom border on it. Other than that, I'm happy with how I covered it. I just wish I hadn't made such a wreck out of decorating it. Still, as best as I can remember, it tasted good. That's the cool thing about cake. I doesn't have to be decorated at all, much less well, to taste good.

Sunday, March 20, 2011

Should've Done Sunday: Purple Packages

Years ago I worked in a very busy bakery. I primarily iced cakes for the decorators and set up the wedding cakes. This was back before rolled fondant was such a huge thing, and nearly all brides were still ordering buttercream wedding cakes. I knew how to work with rolled fondant, as did the assistant manager, so it was something the bakery offered, but we just didn't get that many orders for it.

One lady was having a small wedding and wanted a two-tier cake decorated to look like gift packages. I know, you see these all over the place now, and they've become a bit cliche, but back then it was still a relatively new thing. All I had to go on was the size of the cake, and that she wanted the colors to be white, silver, and periwinkle. She may have actually requested lilac. I honestly can't remember now, but it was one of those nonspecific purplish colors, anyway. The thing is, she didn't bring in any kind of fabric swatch or sample of the color, so I had nothing to try and match. Often one of the hardest things about decorating cakes is trying to read the customer's mind.
Here is the cake I decorated for her, and luckily she was thrilled with it. I was just thankful I got it right. Or right enough to please the customer. I had some issues with this cake at the time, so I while it was adequate, I honestly wasn't 100% happy with it.

For the most part, it's a nice, level cake with no serious flaws, and the top tier is centered well. However, there are certainly a few things I'd like to change.

  • I hate the ruffle. All wedding cakes and "french bouquets" that went out of that bakery got this ruffle ribbon thingy pushed under their base. It's just what they did. I personally think this cake would have looked much better without it. Plus, it made the bottom bead border nearly impossible to pipe evenly and straight, but you can't really tell that from the picture.
  • How do you like all that luster dust? Talk about Super Pearl overload! This was back before I truly understood the concept of less is more. This cake is superfluously shiny.
  • I have no idea what I was thinking when I piped those oversized beads around the base of the top tier. Especially since they're obviously wonky. I should've used the same tip I piped the other beads with, then there would be consistency.
  • Speaking of the other beads, what the heck was I thinking putting them around the top of that bottom tier? It's supposed to look like a gift box with a lid, but instead I think it looks more like a square sofa cushion. 
  • I put way too many blossoms all over the cake, and I think they make the whole thing look too busy. Again with the less is more thing. 
  • Now, I remember at the time not being happy with the bow because it was actually really messy at top, but thanks to strategic camera positioning, you can't see it. Also, I think I should've broken up the purple periwinkle and grey silver with white bow loops. 
  • And finally, the front ribbon on the top tier is crooked. Just slightly, I know, and I didn't even notice it at the time, but has haunted me in this photo ever since.
Okay gang, what did I miss? (Like I how address you guys as if I have thousands of readers?) Comment and let me know! (I always say that, yet rarely does anyone do it.)

Sunday, February 27, 2011

Should've Done Sunday: Girly and Garish

I have a real debacle for this week's Should've Done Sunday. Let's go back in time 12, maybe 13 years. I was desperate to practice all the techniques I learned taking the Wilton courses, but I didn't have that many reasons to make cakes. I also wanted to build up a portfolio of cakes I had decorated to show people what I could do, but at that time I only had maybe six pictures. I knew that professionals sometimes used styrofoam as dummy cakes to decorate, so I scrounged around the house looking for some and manage to fashion what resembled a three tier cake with some careful trimming and glue.

I remember wanting to make an ivory wedding cake, but I didn't have any ivory icing color. For some inexplicable reason, I thought that just adding half a drop of pink would do the trick. Well, it didn't. Half a drop of pink makes... pink. What was I thinking? I'm not a fan of pink, as anyone who knows me will attest. But yet, here I was with however many recipes of icing colored pastel pink, so I had to go with it. Check out this monstrosity.
There are so many things wrong with this cake that I'm not even sure where to begin, but I'll point out the positives real quick so you guys don't think I'm just an over-critical control freak who can only focus on the negative aspects of any given situation. Even though it's true.

  • The roses are decent, and I like the pink and white combination. They could've been better arranged on the top, but for the most part I'm happy with them. 
  • I did a great job on the stringwork. I enjoy doing stringwork for some reason, I just don't get the chance to do it very often. Even the zigzag swags are adequate, and the drop strings are okay.
  • The icing, for the most, part is smooth. This is no small feat considering that proper cake dummies are made to be smooth, but I CUT this styrofoam to size, so the edges and sides were all jaggy with little styrofoam pellets sticking out and falling off. 
Okay, now for all the the things I should've done differently.

  • Even though this is styrofoam and very light, I should've put it on a proper board, covered in freezer paper or something, not a flimsy piece of whatever-that-is wrapped in aluminum foil. Ugh.
  • About the color. I should've added half-a-drop of pink to a small amount of icing rather than the entire batch. I would have realized then that my grand notion of making ivory from pink wasn't going to work and could have used plain white. Or, I should've gone the traditional route and just bought some ivory icing color.
  • I hate the top border on the bottom tier. It looks like I was going for an e motion border with a round tip, but I think it looks out of place when all the other borders are made with star tips.
  • The shells suck. Why are they going different directions? Not quite sure why or what was wrong with me that day, but I should've made them better or used a simple bead border instead.
  • My basketweave work on the top tier also sucks. Big time. This is what happens when you don't take the time to properly divide your cake or use spacer dots when making basketweave.
  • I think the sweet peas hanging over the edge of the top tier are supposed to help cover up the shoddy basketweave, but they're not all that well done either, so they look dreadful. The whole cake would look a lot better without the top tier, actually.
  • I'm not convinced about the my choice of green for the leaves. On the one hand, it is a nice contrast, but I really think it's too dark and I should've used a lighter shade.
  • I'm also on the fence when it comes to the mini drop flowers I used with the stringwork. There needed to be something there to hide where the strings meet, but now I'm thinking some drop beads or something a little more elegant would look better. Especially if I had used a simple bead border instead of those irregular and unsightly shells. 
Okay, your turn! What did I miss? Please feel free to be brutally honest here, as I truly hate this cake. I almost didn't even use it because I'm that embarrassed by it, so you don't have to worry about hurting my feelings. What else is wrong with this debacle of a design?

Sunday, February 13, 2011

Should've Done Sunday: Wilton Wedding

Many years ago, before becoming a Wilton Instructor myself, I was a Wilton student for a few months. This was in 1998, when it was just courses 1, 2, and 3, before they really did much with rolled fondant and long before they added the Fondant and Gum Paste course, which has been relaunched as Gum Paste and Fondant as of last summer. Back then, in Course 3 we dabbled a little in rolled fondant by making a clown face cake using brightly-colored fondant cut-out shapes, but I don't have a picture of it, and it wasn't all that great anyway. We also made a fondant heart cake topper during the second class to use on our final cake, which was a two-tier separated by push-in pillars.
Apologies for the shoddy cropping. I had this photo in my scrapbook and tried to cut out as much of the background as possible. There's really not a LOT wrong with this cake, because I copied it from the back of the student lesson plan, which is evidence of my lack of creativity and imagination, but also was the easy answer since I was working full-time and really couldn't be bothered to come up with anything original.

Anyway, there is a lot going on with this cake, and most of the techniques are no longer taught in the Wilton four-week courses. This is mostly because they're outdated and nobody wants ruffle borders on their wedding cakes now. Thanks to the popularity of rolled fondant and brides preferring more modern designs, string and frills got dropped so that there would be time to teach the latest techniques (that Wilton incidentally had cool new tools for), but still it's a shame.

The hearts on the bottom tier and all the little blue flowers (I think they're forget-me-nots, but I can't remember) were piped with royal icing. The topper is made from two hearts cut from rolled fondant, and in the student kit we got that dinky plastic dove. There were also some plastic beads that we were supposed to attach around the heart, but I piped a bead border with royal icing instead.

The bottom tier also has shell borders and string work, and overall I'm pretty happy with it. The top tier is a six-inch round chocolate cake--which is obvious thanks to the crumbs, grr!--with a shell border around the top and shells with ruffles along the bottom. There were also strings on the sides of this cake, in between the drop beads, but for some reason they didn't stick very well. When I got it back home, half of them had fallen off, so I just took away the rest rather than pipe more. I'm lazy that way.

This was the first tiered cake I ever made, and for the most part it's not too bad. Still, there are a few things that, in hindsight and with the eyes of experience, I should've done. You can probably figure them out, and if you see anything I've missed, feel free to mention it in a comment.

  • I can't remember, but I think I used one box of cake mix for each tier. That's why the top cake is so much taller than the bottom. Ideally, unless you're doing something whimsical, tiers should be uniform in height. I should've either trimmed the layers of the top tier down, or used a box of cake mix for each ten-inch round layer. Thanks to the camera angle, this isn't a terribly obvious flaw, but I know it was there.
  • I should'n't have used chocolate cake on that top tier. See the crumbs showing through? Yeah, chocolate cake is a nightmare to ice with white icing. Unless it's frozen solid, and even then it's a pain. What was I thinking?
  • I really hate the topper. I wasn't crazy about it back then, but I can't stand it now. It looks cheap and cheesy. I should've done something else. Exactly what, I don't know. Any thoughts?
  • I shouldn't have cropped this photo. At least, not like that. 
Okay, so there you have this week's should've done Sunday. Feel free to chime in with anything else I may have missed.

Sunday, February 6, 2011

Should've Done Sunday: Faulty Fish

Colette Peters is one of the more well-known cake artists out there, and she's been doing amazing cakes for a while, long before Duff and Buddy hit the scene and became famous for it. Many years ago I bought her book, Colette's Cakes, and made the fish cake for my grandfather. It was his birthday, and he liked to go fishing.
This was one of the first shaped cakes I ever made, and while I had worked with rolled fondant before, I wasn't at all experienced with painting it, as is obvious. The cake itself is super easy: just bake a sheet cake and cut the fish's body from one corner to the opposite diagonal corner going down the length. Kind of like an ellipse, only with a tapered end for the head. Then, cover it in rolled fondant, and while the fondant is still soft imprint the rows of scales using the wide opening of a piping tip. The fins and tail are rolled fondant that has been shaped and textured with a veining tool. The mouth consists of two small, skinny rolled fondant snakes, and the eye is a flattened pea-sized ball of fondant with black food coloring painted on top.

That was all simple enough, but still, it's pretty dang ugly, isn't it? Needless to say, my effort came out looking nothing like the fish cake in the book. That's because you're supposed to use blue and silver luster dust to paint it. Only I didn't have any blue or silver luster dust, and back then I had no clue where to get any, so I improvised with what powdered food colors I had on hand. I didn't have very much, and those can be pretty pricey, so knowing there wasn't enough to color the whole cake, I thought I could just dilute them with water and make a paint out of them. Wrong! Always add a clear alcohol to powdered colors and luster dusts when painting fondant or gum paste. But really, this cake should have had dry luster dusts brushed on it.

The paint I made didn't adequately color the fondant. All it did was turn the whole thing into a wet, sticky mess. I tried to remedy this by coloring some piping gel and brushing that on the cake, which resulted in the picture above. The colors all pretty much ran together, and piping gel leaves a translucent, wet-looking finish, so it does look like a fish out of water, just not a very pretty--nor appetizing--one.

When done properly, the Colette Peters fish cake looks like this:
No, that's not another one I made. I found this gorgeous fish cake picture over on Flickr, and it's the work of indigojods. She actually has quite an impressive photo stream, with a lot of really beautiful cake pictures if you're interested in seeing more of her work. The tomatoes are a nice touch, and she modeled them out of fondant. I also like the candy orange slices she used better than the chunky ones I used around my cake.

Nowadays luster dust is easy to find at specialty cake decorating supply stores or online. Wilton even makes some that you can buy at craft stores that carry their products. So, while I certainly should've used the right kind of luster dust, that wasn't an option available to me back then. Instead of piping gel, I should've either colored the fondant before covering the cake by kneading some food coloring into it, OR done a bit more research first. Winging it often gets the job done, but I didn't need to figure out the importance of using clear alcohol to make paint the hard way. I also think the piping gel was a mistake, but after my paint debacle, I had to do something to cover up the nasty wet fondant. But still, since it was a cake for family, nobody complained.

Oh, and um... if I really want to be nit-picky: I should've lined up the scales better. They get a bit wonky in places, and that bugs me. I'm ambivalent about the leaves. I was trying to make them look more like seaweed, so I striped the piping bag with darker colors, but I think I went too dark in places, and the leaves themselves aren't all that great. But they're really no worse than the fish.

Sunday, January 30, 2011

Should've Done Sunday: Fondant Fail

This week's Should've Done Sunday isn't a cake from years ago. Today I'm sharing a more recent effort, as I only just made this cake last weekend. It's not the fondant that failed. It was me getting in a hurry and trying to cut corners. I don't feel as though this cake is representative of my skills, as I can do much better, so I'm using it as a learning experience and thinking about what I should've done while it's still fresh in my mind.
Local cake enthusiasts already know about Mecca Sweet Wise, a cool cake decorating supply store. They sell everything cake decorating related, or just about. They also have classes there. Really, really awesome classes. I subscribe to the email newsletter, so I found out late last week that a Fondant II class was scheduled for Saturday afternoon, but I was teaching my own cake decorating class that morning, and I figured it would be too much of a push to get a cake ready and everything else together. Besides, there were 2 other dates for Fondant II, so I figured I'd just take it later.

The thing is, I couldn't attend the February Fondant II class, and that meant I'd have to wait until March to take it. That was way too long for me. I'm not a patient person at the best of times, so I decided to go ahead and do the class last weekend. This meant I had to bake a cake last-minute, so it was a Duncan Hines job, not from scratch. The trouble with cake mixes is that they often produce cakes that are so light they don't always hold up under the extra weight when covered in rolled fondant. I know, there are ways to "doctor" them, but I was rushed and really was only thinking that I had to get a cake made ASAP.

I waited until after I got to Sweet Wise to ice and cover my cake with fondant, which wasn't that big of a deal because I arrived early for that purpose, but the cake wasn't cooperating. I froze it overnight, but it spent all morning in the van while I was teaching my class, and it was a sunny day so the van was warm. Icing a less-than-cold cake is a drag, in more ways than one. Normally that's not a huge problem because once the whole thing gets covered in fondant nobody knows what the crumb coat underneath looks like, but it was still frustrating.

Also, I didn't take time to level the layers. They were pretty flat anyway since I used my trusty Bake Even Strips, but I did the trick where you position the tops against each other in the middle. That probably would have been fine, except I forgot to gently press the top of the cake before icing it. As the cake settled, especially with the weight of the fondant, it created that inner tube effect around the middle of the cake where the icing between the layers bulged out.


For some reason--I blame Wilton brainwashing--I was convinced I had to have the cake on a board-to-size before putting it on the silver cake base. The trouble was that I baked an 8-inch round cake but only had 7-inch round cake circles, so that's what I had to use, and it was too small. I knew this, but yet I still attached the cake to it. This, my friends, is what happens when there's not board underneath to support the fondant. It sags there around the bottom where the cake is higher than the board. I tried tucking it under, but that actually seemed to make it worse. I didn't have time to make a bottom border that would cover it up, so I know it's not pretty.
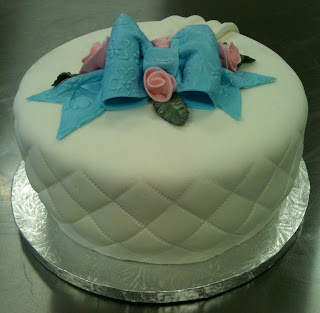
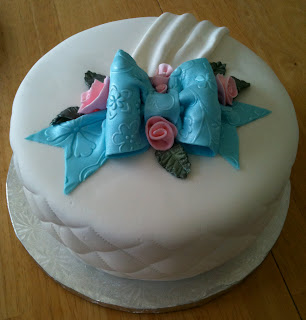
I did okay on the quilting job, but I was feeling rushed and a bit flustered at this point, so there are places where I messed up. To add insult to injury, I somehow managed to stick my thumb in the side while I was working with it. I already embossed the sides, and the fondant had started to dry enough so that I couldn't smooth it out.


I'm happy with the bow, but I hate that the left ribbon tail is so much longer than the right. I didn't even notice that until I got it home and tool pictures. I also wish I'd done a better job of centering it. The green I used on the leaves isn't ideal for the blue and pink, but it's the only green luster dust I have. It looks much better with ivory roses, trust me. The fabric swag is okay, but I wish it was positioned better. We were really just learning how to make them, and at that point I just stuck it on the cake without really thinking about the bow, roses, and where it all should go.


So, taking the above into consideration, and understanding that there's always room for improvement, here are my thoughts on what I should've done to make this cake better:
  • Had the cake already iced before leaving the house. This is probably the biggest thing, as it would have either eliminated or alleviated some of the other issues and given me more time to cover my cake in fondant.
  • Trimmed the cake tops so the layers were completely flat against each other when I stacked them. That would have prevented the spare tire. Oh, and I should've remembered to push the layers together so the filling would settle.
  • Not messed with the dang cake circle underneath. That was a useless waste of cardboard. There's no reason I couldn't have this cake sitting directly on the silver cake base.
  • Been more patient when doing my quilting on the sides and more careful when imprinting the pattern.
  • Paid more attention to the bow tails' lengths and made them at least a little more even.
  • Borrowed a more suitable color of green luster dust for the leaves.
  • Planned out where I was going to place everything better and centered the bow.
  • Bought the floral imprint mat I used to make the bow. I seriously love it, and it wasn't that expensive. Now I really wish I had it.
  • I'll concede: I should've taken the time to put at least a bead border around the bottom before taking a picture and posting it on my blog.
At the end of the day, it's still a decent-looking cake. I'm not trying to be overly critical and nit-picky, but that's my work, and I consider myself a professional, so I need to have high standards. It's all in the interest of promoting excellence in cake decorating, you see. So with that in mind, what else could I have done differently to make this cake better?

Sunday, January 23, 2011

Should've Done Sunday: Rubbishy Roses and a Pathetic Pond

My brother-in-law and I both have spring birthdays that occasionally fall near or on Easter, since Easter is one of those awkward holidays that likes to jump around instead of just being the same date every year. I vaguely remember using his birthday as an excuse to make this cake, which is why it has "Happy Birthday" ineptly written on it. But honestly, I was going to make this cake anyway.

Allow me to take you back in time to the spring of 1998, before I had taken any Wilton cake decorating courses, but after I attended a few beginner Sugarcraft adult ed classes. I was living in the UK at the time, where they use mostly rolled fondant (aka sugarpaste) and royal icing. Well, after having a few tries at covering a cake with rolled fondant, I really wanted to have a go at working with royal icing. That's right, this cake was iced with royal icing, not buttercream. I vaguely remember adding something to it... glycerin or glucose to make the icing not quite so rock-hard when it dried, but I can't recall anything about how it tasted. I don't even know what kind of cake is underneath there, but I suspect it's a fruitcake, most likely with a layer of marzipan separating the cake from the icing. That's how they did things over there.


This was only my third or fourth cake, so taking that into consideration, on the whole it's not a bad effort. On the one hand, I don't want to be too critical since I was just a beginner, but there's definitely loads of room for improvement. The one positive thing I can say about it is that I did a pretty good job combing the sides, as that looks fairly even and tidy, but here's what I should've done:
  • Tidied up the lettering. Piping skills, especially writing, improve with practice. It's pretty obvious that I hadn't had much experience writing on cakes because these letters are uneven, poorly formed, and have peaks where I neglected to fully release pressure on the piping bag before pulling the tip away. All of that could have been corrected with a small, damp paintbrush, but I didn't know that at the time. 
  • Written "Happy Birthday" in cursive. Printing with icing is trickier than writing in cursive, which is why nearly all bakeries write "Happy Birthday" on their cakes in cursive. Again, something I didn't know back then.
  • Used a different bottom border. To be fair, I didn't yet know how to pipe shells, so that's why this cake has a star border. While the stars are fine, I think small shells, beads, or even dots would look better.
  • Left the cake board uncovered, or fully covered it. I have no clue why only the top of the cake board is covered, in pink fondant no less, ugh. The uneven, jagged edge is such an eyesore, highlighted by the shiny silver board underneath.
  • Left off the roses. They're really out of place. I don't have as much of a problem with the overabundance of blossoms, even though their scale is a bit off, but the roses shouldn't be on there at all. How many roses do you ever see growing individually, straight from the ground, with no stem but two obnoxiously oversized leaves? Plus, the roses are not at all well made. I obviously still needed practice forming flowers, too.
  • Colored a sufficient amount of green icing the first time. The mismatched green was not intentional. I messed up something--probably the letters--and tried to fix it, screwing up the icing underneath in the process. I tried to blend the colors by putting the darker green elsewhere around the cake top, but I really should have scraped the whole top off and started again. Here's a pro tip: always color enough icing required for the job. Trying to match colors if you run out is impossible. You might get pretty dang close, but usually only after wasted time, energy, and a fair amount of frustration. That was a lesson learned the hard way.
  • Left off the pond. It's way too small. It's really more like a puddle. Yet another sizing/scale issue. If I had to make this cake today, I'd either lose the pond altogether or make it closer to half the size of the cake top and add some wee ducks or something. 
  • Another thing about the pond: I made it out of blue rolled fondant. I tried to add a realistic touch with the bumps, but I should have marbled some blue and darker blue fondant for it. Using blue piping gel to make the pond would be an even better option.
  • Made a different top border, or just left the cake without one. I don't like the top edge of this cake. That border is meant to be like a garden fence or something, which I guess is why I didn't put it around the pond. I made it with a frill cutter, and you can clearly see where it's not attached cleanly and is leaning.
  • Used fewer blossoms. I got a bit carried away with my blossom cutters. This is definitely a case where the concept of "less is more" would have been well applied. Oh, and I should've only used the smaller blossoms on this cake, again with the scale thing.
  • The bunny isn't perfect, but I have a thing for rabbits so I'm going to leave it alone. My modeling skills could still use a lot of work. I'm willing to admit my limitations there and focus on what I can improve. I don't like how he looks sad, but I can't really blame him. I'd want a prettier cake to sit on, too.
The nice thing about making cakes for friends and family is that no matter what they look like, they're always well received. Nobody complained about any of the above at the time, and I seem to recall that I was rather proud of this cake back then. Now I look at it and wonder what I was thinking. What do you think? Is there something I missed or anything you'd do differently? If so, please leave a comment letting me know.

Sunday, January 16, 2011

Should've Done Sunday: Doll Debacle

I'm not a big fan of doll cakes, but they're popular, especially for girls' birthdays, so I've had to make my fair share of them. For anyone who doesn't know what I'm talking about, doll cakes are a Barbie-type doll on top of a dome-shaped cake that is decorated to look like the skirt of her dress. Usually the doll is just a pick--meaning only the waist and above on a plastic stick that's inserted into the top of the cake before decorating, but sometimes I've had to use an actual doll. That's usually the case when the cake is meant to be a specific Barbie (like the Disney princesses).

I don't like them because they're a pain. Baking a cake into a dress shape should be easy enough using a pudding basinor pan otherwise designed for that purpose, but with a cake that thick it's easy to burn the edges before the center is baked. Also, the bottom of the dress (wide end of the cake) has to be level or else the whole cake will look crooked. The doll needs to be centered, and that's a trick and a half if you're using a real doll with legs to contend with. The picks are much easier to work with, but then the birthday girl doesn't have a new Barbie doll to play with once the cake is served.

So, for my inaugural Should've Done Sunday, I'm going to critique a Sleeping Beauty (I think that's who this is, right?) doll cake I made years ago for a little girl's birthday. Here she is.
Most doll cakes will only serve 12, which won't be enough for big parties, and this little girl had a lot of friends. I tried to remedy this by putting the doll on a sheet cake with the idea of giving the dress a train (and the host more servings), but it didn't look right, even after I trimmed the sheet cake into more of a dress-train shape.
Also, remember what I said about the doll needing to be centered? Well, this one isn't, and that's why it looks like she's leaning back. It's not easy to get the legs to go straight down the top of the cake, even when they're taped together and wrapped in saran wrap.

I'm not sure what I was thinking with those roses, either. The mom must have requested flowers, but why did I put those clashing blue colors together? Plus, the scale is all wrong. I realize it's a cake, not a nature documentary, but oversized mutant flowers really have no place here. I seriously doubt Sleeping Beauty would be walking through a garden of ankle-high roses. Not in that dress, anyway.

Here's what I should've done:
  • Explain to the customer that the cake she wants won't be sufficient to serve the number of guests and suggest she also have either cupcakes (decorated to match) or a separate sheet cake so there's enough for everybody.
  • Instead of colossal roses, have a simple bead or ruffle border along the bottom so it looks like part of the dress.
  • No clashing blue hues, ugh.
  • Center the doll better--although, I honestly think I did the best I could at the time.
  • It's not so obvious in the picture, but I really went overboard on the cake sparkles. In the actual photograph it's more noticeable, and Sleeping Beauty looks like she has a thick layer of dew all over her. So yeah, less edible glitter.
Other than that, this cake is pretty decent. I have a few more doll cakes I'll share as and when the mood strikes me, but this one had the most issues. I would love to hear your ideas of how this cake should've been done, or any doll cake related experiences you'd like to share in the comments.

Sunday, January 9, 2011

Should've Done Sunday

Today I saw an old friend for the first time in over a year. By old friend, I'm not referring to her age; I mean that I've known her a long time. I decorated her wedding cake, and at the time it was the biggest project I had ever undertaken. Not because it was that complicated or difficult, but because I was still pretty much a beginner decorator. I was so proud of that cake, and it was pretty, but I look at pictures of it now and I can't help but see flaws and where I went wrong. I guess that's the eye of experience or something, but there's a long list of "Should've Dones" for that one.

I have quite a few pictures of cakes I've decorated over the past 14 years, and while I must have thought they looked good enough on the day to take their picture, some make me cringe when I look at them now. So I thought I'd share some of them here on my blog. The nice thing about past mistakes is that you can learn from them and do better the next time.

Starting next Sunday, because it's way too late for me to go digging up an old picture and hook up the scanner and all that now, I'll post a photo of a randomly selected cake from my past and tell you what I don't like about it now and what I think I should've done instead. I'm not promising a Should've Done Sunday post every week, but I'd like to make it a regular theme.