Showing posts with label cake. Show all posts

Sunday, April 22, 2012

I Love Free Stuff

Being a Wilton Method Instructor definitely has its perks. One thing I always look forward to every year is the Annual Instructor Meeting (AIM) because not only do we have a good time and learn from demonstrations, but we always go home with a nice collection of free Wilton gear, usually items recently added to the product line.

This year they released a lot of new cake decorating tools, and they've revamped and improved some of their existing products. Here's all I brought back, minus a tub of 101 cookie cutters that just wouldn't fit right in the picture and a pack of butterfly stickers I totally forgot about. "Wilton Brands" also includes some scrapbooking and craft supply companies, and the stickers are from EK Success.
At some point I'll completely unpack everything and show more of the actual tools themselves, but that might be better done as a video, and I have the Sugar Play Day to get ready for in a few hours, so this is all I have time to post for now.

At the end of the meeting, the leftover display products were randomly given out to instructors via a drawing, and I got one of the new tip organizers. There are many reasons why this one is better than the old tip storage boxes, but the main thing is the top locks on really tightly, and the lid doubles as an angled base so you can more easily see your tips. Oh, and the little caddy up top is for storing large piping tips. This was a win.
I also got some butterfly sprinkles and stamens. Not the pearl stamens I was looking for, but lily stamens, which I can most definitely use. They gave us a new cake leveler, too. This one is much better. It's easier to adjust the wire, and it's more sturdy.
Wilton updated their icing bag holder, and in addition to having better sized holes, this new one isn't flimsy like the old ones. A totally new product is the Decorating Bag Sleeve. You get three in a box, and these remind me of the things you cook Hot Pockets in. They hold the bag upright so you can fill it with icing, and then afterwards, once the bags are all washed and clean, they prop them open so they can air dry.
The new fondant tools we received are pretty much improved versions of what we already have. There's a redesigned fondant smoother, and I'm really excited about the easier to use ribbon cutter and amped up embosser wheel.
Both of these tools come with handy storage boxes, which is a definite plus. Inside the boxes are little pegs to keep the bits and pieces organized and easy to find.
Oh, and here is the display piece I made, representing all of the Wilton 4-week courses. They were having a drawing for one of those new Ultimate Rolling Tool Caddy things, and if you brought in a display you were entered in the drawing to win it. Sadly, I didn't win. Something like this would really be useful, but I may wait and see if they put locking casters on the wheels before I get one.


Thursday, April 19, 2012

Minecraft Diamond Ore Cake

Minecraft is very popular at our house, and for my older son's recent birthday we made a diamond ore cake. In case you don't know what they look like, or can't be bothered to follow the link to Minecraft Wiki, here's what we were going for:

When it comes to projects like this, I like to see if I can find somebody else who has managed to make something similar, so I can pretty much just do whatever they did since it seemed to work out for them. Like I needed another excuse to browse around Pinterest, right? While I didn't find a diamond ore cake, I discovered a couple of different dirt block cakes: one is exceptionally well done with thousands of little rolled fondant squares, and the other is more simple, made by YouTuber MincraftChick. I also found these Minecraft Cake cupcakes, which I think are lovely.


Making a cake that's a cube shape was easy enough, we just used three 8-inch square cake layers. Since they're between 2 and 3 inches tall each, stacked up they looked enough like a cube. We decided to add an extra level of fun and color the cake layers themselves gray with blue flecks, so that when you cut into the cake, it looked like diamond ore, not cake. This didn't work out so well, as the blue sprinkles I planned to use (like funfetti) dissolved in the cake batter and turned it an awful blueish gray.

I used Duncan Hines Classic White cake mix and added around 4-5 drops of Super Black food coloring to make the layers gray. We then sandwiched them together with gray-tinted buttercream and a generous layer of the blue sprinkles.

We were going for a marbled gray rolled fondant to cover the cake with, but by the time I got it rolled out large enough, the color was pretty thoroughly mixed in. We tried embossing the square pattern on the top and sides of the cube, and that looked okay, but we ultimately opted to add rolled fondant squares in gray and various shades of blue all over the cake. I'm pleased with the results.
To go along with the diamond ore cake we made dirt block treat pops. These are like cake pops, only made with rice cereal treats instead of cake. They're much easier and quicker to make, as they don't require multiple steps of chilling, and it's a firmer mixture to shape. These we dipped in chocolate bark coating and then dipped the tops in green sanding sugar.
We also constructed a pickaxe out of the rice cereal treat mixture and covered it with chocolate bark coating on the handle and white candy melts on the blade part.
Sadly, I neglected to get any pictures of the cake after it was cut so you could see all the gray goodness inside. One of the layers turned out just a shade or two darker than the others, as is typical. It's so hard to match colors exactly when you try to remix them.

Sunday, March 20, 2011

Should've Done Sunday: Purple Packages

Years ago I worked in a very busy bakery. I primarily iced cakes for the decorators and set up the wedding cakes. This was back before rolled fondant was such a huge thing, and nearly all brides were still ordering buttercream wedding cakes. I knew how to work with rolled fondant, as did the assistant manager, so it was something the bakery offered, but we just didn't get that many orders for it.

One lady was having a small wedding and wanted a two-tier cake decorated to look like gift packages. I know, you see these all over the place now, and they've become a bit cliche, but back then it was still a relatively new thing. All I had to go on was the size of the cake, and that she wanted the colors to be white, silver, and periwinkle. She may have actually requested lilac. I honestly can't remember now, but it was one of those nonspecific purplish colors, anyway. The thing is, she didn't bring in any kind of fabric swatch or sample of the color, so I had nothing to try and match. Often one of the hardest things about decorating cakes is trying to read the customer's mind.
Here is the cake I decorated for her, and luckily she was thrilled with it. I was just thankful I got it right. Or right enough to please the customer. I had some issues with this cake at the time, so I while it was adequate, I honestly wasn't 100% happy with it.

For the most part, it's a nice, level cake with no serious flaws, and the top tier is centered well. However, there are certainly a few things I'd like to change.

  • I hate the ruffle. All wedding cakes and "french bouquets" that went out of that bakery got this ruffle ribbon thingy pushed under their base. It's just what they did. I personally think this cake would have looked much better without it. Plus, it made the bottom bead border nearly impossible to pipe evenly and straight, but you can't really tell that from the picture.
  • How do you like all that luster dust? Talk about Super Pearl overload! This was back before I truly understood the concept of less is more. This cake is superfluously shiny.
  • I have no idea what I was thinking when I piped those oversized beads around the base of the top tier. Especially since they're obviously wonky. I should've used the same tip I piped the other beads with, then there would be consistency.
  • Speaking of the other beads, what the heck was I thinking putting them around the top of that bottom tier? It's supposed to look like a gift box with a lid, but instead I think it looks more like a square sofa cushion. 
  • I put way too many blossoms all over the cake, and I think they make the whole thing look too busy. Again with the less is more thing. 
  • Now, I remember at the time not being happy with the bow because it was actually really messy at top, but thanks to strategic camera positioning, you can't see it. Also, I think I should've broken up the purple periwinkle and grey silver with white bow loops. 
  • And finally, the front ribbon on the top tier is crooked. Just slightly, I know, and I didn't even notice it at the time, but has haunted me in this photo ever since.
Okay gang, what did I miss? (Like I how address you guys as if I have thousands of readers?) Comment and let me know! (I always say that, yet rarely does anyone do it.)

Wednesday, January 5, 2011

A Heads Up For the Locals

As some of you may already know, I'm starting a new cake decorating class series this month at the Franklin Recreation Complex. The facility is hosting an "Art Sparks" event on Saturday, January 29 from 10:00 a.m. until 3:00 p.m. to promote all the arts and crafts programs they offer.


I'll be there with my little display, along with some cookies, cupcakes, icing, and maybe even some sprinkles in an attempt to drum up interest in my classes. The event is free to the public, so if you don't have anything else going on, why not stop by? It's never too late to learn a new skill, and we all need creative outlets. Come see me, and I'll let you decorate a cookie or something.

Sunday, November 7, 2010

Chocolate Torte Dressed in Berries

CAKE! That would be a moist, dense chocolate cake with yummy strawberries covered in a rich ganache. I've been wanting to make this recipe ever since seeing it in The New InterCourses: An Aphrodisiac Cookbook (a word of warning here, since this is a family-friendly blog: this book contains tasteful photographs of people wearing food. I wouldn't call it nudity, as their relevant bits are covered up, but the pictures are consistent with the book's overall theme).

This recipe is for a flourless cake, so it's already gluten free, and I didn't bother to try and sub out the sugar because it's been a while since I've made something like this. A wee bit of butter and sugar from time to time is fine, in moderation of course. We all need our guilty pleasures.

For the Chocolate Torte:

1 cup toasted almonds, finely chopped
6 tablespoons cocoa powder
2/3 cup unsalted butter, softened
1 cup sugar
1/4 cup brown sugar
4 large eggs
1 teaspoon vanilla
1/2 cup chopped fresh strawberries
1/2 cup strawberry preserves

Preheat oven to 350 degrees and grease an 8 or 9 inch springform pan. Since I still don't HAVE a springform pan (any bakeware companies that want to send me one to review please feel free!) I used my 11-inch loose-bottomed tart pan.

Combine almonds and cocoa powder in small bowl. Place butter and sugars in mixer bowl and cream until light and fluffy.

Beat in eggs (one at a time) and add vanilla.


Fold in almond-cocoa mixture and strawberries.


Spread into pan and bake about 40 minutes, or until toothpick comes out clean. It might be a good idea to put the cake pan on a cookie sheet, just in case there's any seepage.


Cool completely and remove sides of pan. Mine got a bit messed up around the edges from where the cake stuck to some areas of the tart ring, but that's easily covered up.


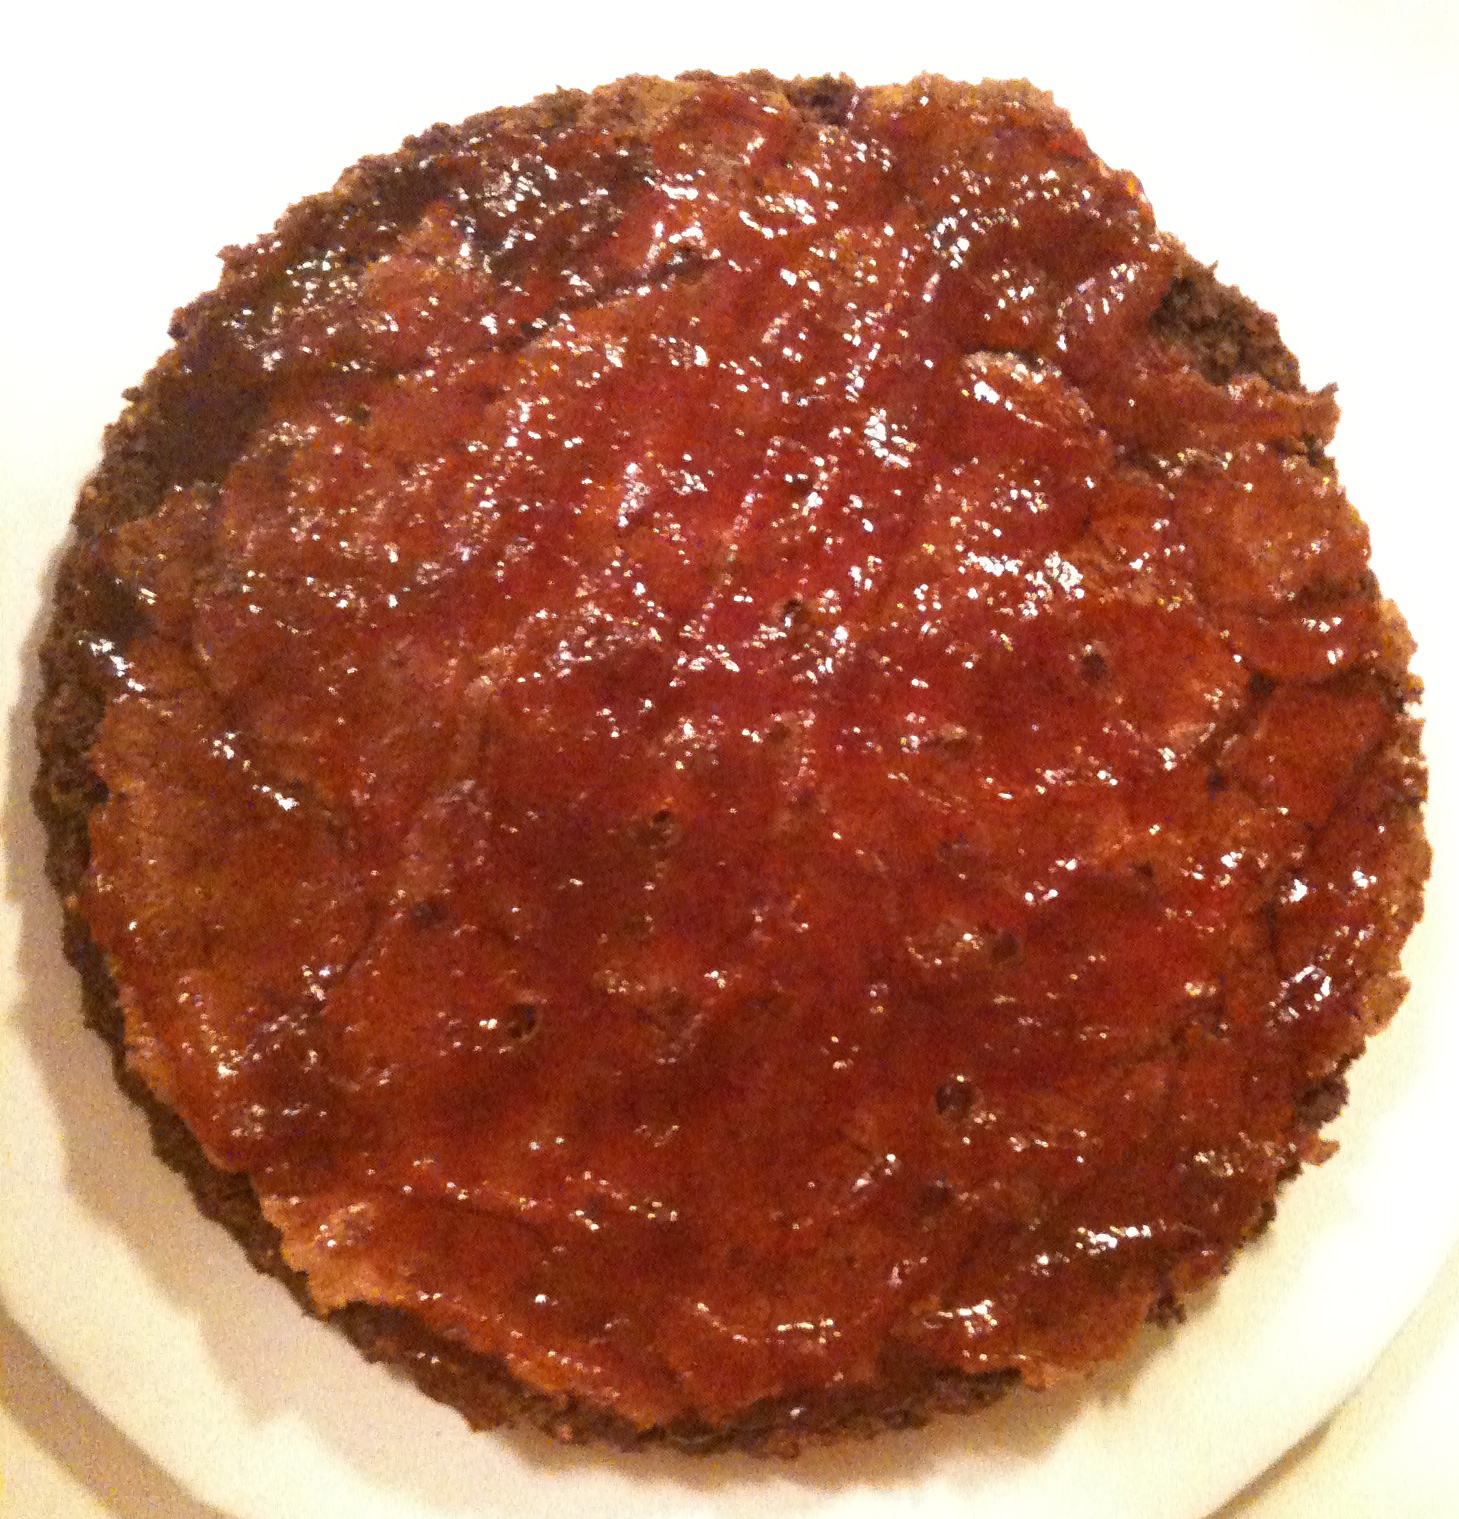
This cake is VERY moist and likely to fall apart, so leave it on the pan base and place it on a serving plate. Spread the top with the strawberry preserves.

Now, for the ganache topping you'll need:

1/4 cup heavy cream (I used coconut milk because I need it to be dairy free)
6 ounces high quality dark chocolate, finely chopped (I used 60%)


Bring cream/coconut milk just to boiling in a small saucepan. Remove from heat and add chocolate, stirring until smooth. Pour ganache onto cake and spread over top. I had enough to also ice the sides, thereby covering up the tattered edges.

Decorate with strawberry slices and mint sprigs (which I didn't have, so I didn't use). Chill until serving.


Here's what it looks like on the inside. It's very moist. chocolaty, and gooey. A super easy recipe that's delicious. How awesome.

Sunday, May 9, 2010

Cricut Cake Machine

Check this out! This machine is so cool. It's a food-safe cutter that works with regular gum paste or Cricut's own icing sheets. Plus the other Cricut cartridges work with it!


Cricut Cake Machine - Kitchen Red Order at
ScrapbookPal.com
$329.99
The Cricut Cake Personal Electronic Cutter is specifically designed for decorating professional-looking cakes, cupcakes, cookies, and confections in no time at all. Just choose a shape, a size, and press CUT. Decorating like a professional has never been faster or easier. Bon Appetit! Includes: The Cricut Cake Personal Electronic Cutter, Instructions, foodsafe blade, 12 x 12 foodsafe cutting mat and Cricut Cake Basics Cartridge. Available now!

Click Here to order at www.ScrapbookPal.com

Of course, this machine is also available on amazon.com (isn't just about everything these days?)


So, uh... To the lovely folks over at Provo Craft, I'm volunteering myself as a reviewer if you'd like to send one my way to test drive!

Wednesday, March 31, 2010

Ribbon Cutter Tool Fun

My son likes to decorate his own birthday cake. This is a tradition he started on his 4th birthday. I bake and ice a sheet cake, then he designs the top using food coloring markers and edible Rice Paper. This year, when we went to Sweet Wise to purchase the necessary supplies, the rice wafer paper was out of stock. Instead, we opted to cover the cake in FondX rolled fondant (don't worry, this brand actually tastes good!), and he then used the food coloring pens to draw directly on the top of his cake. He loves to play video games. Past birthday cakes have featured Guitar Hero and Rock Band instruments and Sackboy from Little Big Planet. This year, it's all about Crash Bandicoot. Here is the finished cake:


Originally he didn't want any kind of bottom border, but I suggested we have something to make the cake look finished, attention to detail and all that. He wasn't fussy about what went on the bottom, as long as it was red. Well, I'll take any excuse to play with my ribbon cutter tool!
First I tried using the striped embosser, but that made too wide of a ribbon.


You can see how short the cake is, and I didn't want to completely cover up the sides.


So, I tried using the zig-zag cutter with the 1/2" spacers.


But the zig-zag on the bottom didn't look right, and it was tricky positioning the ribbon around the cake evenly. Plus, the white bottom edge showed through.


So, I reloaded my ribbon cutter to make one edge straight and the other zig-zag.


This worked the best, and so that's what I ended up using.


It's a very versatile tool and a lot of fun to use. It's all about creative freedom, you know!


Friday, February 19, 2010

Chef Jeff's Chocolate Cloud Cake

Several weeks ago I made this "Chocolate Cloud Cake" from the Chef Traveler blog. Jeff Pirtle is the chef on a yacht. He often tweets about what he is cooking, and he has a daily newsletter.

Chocolate Cloud Cake
Serves 8-12

8 oz good quality semi-sweet chocolate (I used 60%)
1 stick (1/2 cup) butter, cut into pieces
6 large eggs: 2 whole, 4 separated
1 cup sugar

Preheat oven to 350 degrees. Line the bottom of an 8" springform pan with wax paper (I used parchment). Melt the chocolate and butter in a bowl set over hot water and allow to cool. In mixer bowl, whisk the 2 whole eggs and 4 yolks with 1/2 cup of the sugar. Add in the chocolate mixture. Beat the egg whites with an electric mixer until foamy, (make sure everything is grease-free!) then add the remaining sugar and whisk to stiff peaks. Fold in chocolate mixture, then pour into pan. Bake 35-40 minutes, until cake is puffed and cracked (don't over bake). The center will fall as the cake cools.


If you don't have a springform pan, do yourself a favor and line the sides and bottom of your pan with parchment paper. This cake worked out fine, but it did get a bit smushed when I tried to flip it out of the pan.


Whipped Cream Topping:

1 1/2 cups heavy cream, well chilled
3 TBSP powdered sugar
1 tsp vanilla extract
Shaved chocolate

Whip the cream with the sugar and vanilla until stiff peaks and fill the cake center. Top with shaved chocolate.


This cake is flour-free and delicious. I think it has room for improvement, though. The next time I make it, I may try adding some seedless raspberry jam filling to the sunken center before topping with the whipped cream. Or I may decide to go all Black Forest on this cake and use cherry pie filling instead.

Thursday, September 4, 2008

Cakes I did for the State Fair

I forgot to take pictures of my non-decorated cakes before leaving the house this morning, and once at the Fairgrounds I really didn't have the time or space to take them out of their plastic domes. I also forgot my camera. I took these pictures with my cell phone, so apologies for the inferior photo quality.

Mmmmmm, chocolate... This is the same sour cream chocolate cake I previously raved about, only I finally found some dark dutch-process cocoa powder to use in it this time. It definitely makes it better! The layers are filled with ganache, and it's covered with sour cream chocolate icing. 

Pictured below is my white cake with mousseline buttercream icing and seedless raspberry jam filling. The cake has a bonus raspberry kick thanks to the addition of Chambord to the icing and the simple syrup used to keep the cake moist.

Determined to redeem myself for the forgot-to-add-vanilla-extract debacle that was my County Fair entry, I also made this buttermilk pound cake with hot buttermilk glaze and made  a point to remember the vanilla extract this time. :)

The theme for the decorated cake competition is "Election 2008." I had a hard time coming up with a creative idea for this one. I decided to go with the "Road to the White House" idea. My final cake doesn't really match my vision, but some elements I wanted to include either didn't work, didn't hold up, or didn't get done. For example, I really wanted to put red, white, and blue blankets on the elephant and donkey so they would look more like the political party mascots (and also to cover up a few flaws). I also had a bigger platform planned for the white house which would have added height and 2 more steps, but I broke it and didn't have time to make another one. Basically, I procrastinated for too long and ran out of time, as well as fondant.


Back view of the cake:

I wasn't 100% happy with my elephant. His ears don't look quite right, and one of the tusks broke and I had to use one of the spares I made which didn't match the other one in length or thickness. I also forgot to add the little tassel on the bottom of his tail.

I think the donkey turned out a little better, despite the fact that I forgot to finish his tail and I had to make his legs too thick in order to support the weight of his body and head. He also lacks a neck, and therefore a mane.

The white house is a color flow piece which I attached to a fondant-covered slab of styrofoam. I made made the sky with a combination of blue and super pearl lustre dust. I sprinkled clear cake sparkles on the fountain right after filling it in while the color flow icing was still wet. I went ahead and put my spare piece on the back of the cake even though the other side of the white house has a rounded front. This was again due to my time crunch and the fact that I couldn't find a coloring book page of that side of the white house the correct size or aspect. 


Here is a close-up of my sentry. It's adapted from a vintage Vargas pin-up. I thought it was appropriate to have a tenacious, dominate female clad in federalist garb guarding the road to the white house and blocking the path of the elephant and donkey.