Showing posts with label dairy-free. Show all posts

Tuesday, June 14, 2011

National Strawberry Shortcake Day

Happy National Strawberry Shortcake Day everybody! Driscoll's is supposed to be announcing the winners to their contests today, and to further commemorate the occasion, they sent out some coupons so I could make the Strawberry Shortcake recipe they emailed me. Except I opted to make a gluten and dairy free version. I adapted this recipe from the one posted on the Without Adornment blog.
 
I had a slight panic when I initially didn't see any Driscoll's strawberries in the produce department of our local grocery store, until I made my way over to the organic section, and there they were. I was actually pleased that the only Driscoll's strawberries there were organic, because strawberries are on the "dirty dozen" list, so it's a good idea to opt for organic whenever possible. Especially when you have a coupon to get them for free!

For the shortcakes:

1 cup brown rice flour
1/2 cup tapioca starch
1/4 cup potato starch

1 teaspoon xanthan gum
1 Tablespoon + 1/4 teaspoon baking powder
1/2 teaspoon salt
4-5 Tablespoons coconut oil
3/4 cup + 2 Tablespoons coconut milk (cream removed)
1 teaspoon maple syrup
1/2 tsp apple cider vinegar (which I THOUGHT I had, but I didn't so I subbed regular vinegar)

Important: Refrigerate a can of coconut milk overnight so the cream rises to the top. Scoop off the cream and keep, as it whips up like heavy cream and is a great dairy-free alternative to whipped cream. Also, a few hours before you're ready to whip the coconut cream, chill your mixer bowl and whisk in the freezer.

Preheat the oven to 425 degrees. Whisk the together the flour, starches, xanthan gum, baking powder, and salt in a large bowl until well combined. Mix in the coconut oil until there aren't any big chunks. 
  
Add liquid ingredients, and stir with a fork until dough is mixed and starts to come together. It will be like biscuit dough. Pat or roll out dough to around an inch thick on a well floured surface, and cut using a 3-inch round cutter. I actually don't have a round cutter that size, so I used a tumbler, which was a good half an inch larger in diameter. As a result, I didn't get as many shortcakes from the dough, but they were bigger.
 
Place the shortcakes on a cookie sheet. The recipe didn't say if they should be touching or spread out, but most biscuits bake slightly touching each other, so I tried it both ways. It didn't seem to make any difference whatsoever.
  
Allow the shortcakes to cool completely. While they're doing that, you can make the filling. Wash, hull, and slice the strawberries and set aside.
 
Remember the coconut cream reserved from the can of coconut milk? Well, place it into the chilled mixer bowl and beat until it's the consistency of whipped cream. You can gradually add some powdered sugar, or I used a little of my leftover Xylitol. I also put about a small dollop of maple syrup in there, mostly to see how the coconut cream would whip up with maple syrup added, but also to try and give it a deeper flavor.
  
To assemble the shortcakes, slice them in half horizontally, spread coconut cream on top (I also put some strawberry jam on two of the shortcakes first, just to see how that would taste). Then pile slices strawberries on the top and serve.
  
Since these were bigger than they were supposed to be, we enjoyed them as open-face strawberry shortcakes. If you use a smaller cutter, then you can make them the more traditional way, with the filling sandwiched in between the two slices of shortcake. You could even put more cream and strawberries on the top and layer it like a trifle.
  
Overall, I'm very pleased with how these came out. The shortcake is really best eaten the day it's made, though. I kept mine in the refrigerator, and they seem to get denser and heavier (and hard like a hockey puck) the longer they hang around. As far as texture, it comes close. Taste-wise, they're pretty adequate, but I don't think they taste good enough to eat one their own. Some sort of filling or spread really helps them. I personally liked the strawberry shortcakes I made with a thin layer of strawberry jam better than the ones without. But I have a serious sweet tooth, and really both ways these were yummy.

So, who else is celebrating National Strawberry Shortcake Day? If you have a favorite shortcake recipe, gluten-free or otherwise, please feel free to share!

Wednesday, January 12, 2011

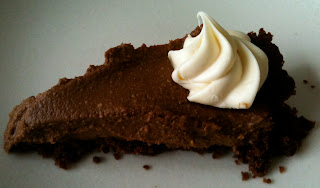
Chocolate Mousse Tart-Type Thing

Whenever I'm bored or procrastinating I tend to browse recipes. I have several apps on my iPhone in addition to numerous cookbooks I like to peruse, and then of course there's the infinite Internet. I'm terrible at making decisions and hate to go grocery shopping, so I usually pick recipes that call for ingredients I already have on hand and, in most cases, need to go ahead a use because they've been around for a while.

I recently made a dairy-free chocolate mousse I saw on the recipes section of the Whole Foods website. Mine didn't come out nearly as smooth and creamy as their picture, but it still tastes good even if the texture is off. The trouble was that the recipe made quite a lot, and I couldn't help thinking that it would be better as a filling for something rather than just eaten on its own.

I figured I'd try pairing it with the same tart crust I used to make those Chocolate Raspberry Truffle Tarts last year, except I didn't have enough pecans, and I couldn't be bothered to toast them. Instead I used half pecans and half walnuts, but then I think I processed the crust too much because it was pretty moist and didn't seem like it would go all that well with the mousse. I was really wanting a cookie-type crust, not a thicker and denser version of the mousse, so after I pressed the crust mixture into a loose-bottom tart pan I baked it in the oven to try and firm it up and dry it out. This made it more like a dense brownie. Not exactly what I envisioned, but I had to go with it.
Chocolate Mousse
3/4 cup raw cashews
1 cup packed pitted dates (about 20)
1 (15-ounce) can pureed pumpkin (the recipe actually calls for butternut squash, but I didn't have any.)
3/4 cup unsweetened coconut milk
1/4 cup cocoa powder
1 teaspoon vanilla extract
Cover cashews and dates in with hot water and soak for 2 hours to soften. Drain well.
  
Place cashews, dates, pumpkin, and coconut milk in food processor bowl and process until smooth. Add cocoa powder and vanilla, and process until smooth and mousse-like, adding a bit more coconut milk if needed. Chill at least 1 hour or until ready to serve.

As mentioned, mine didn't quite make it to the smooth and mousse-like stage no matter how long I processed it, so I eventually gave up and just accepted that my would have some coarse bits of cashew in it.
 

Tart Crust
3 cups nuts, I used half pecans and half walnuts
3/4 cup pitted dates, roughly chopped
1/2 tsp salt
1 tsp pure vanilla extract
3 TBSP cocoa powder
I upped the cocoa powder to 3 tablespoons this time, while decreasing the salt by a bit and only adding 1 tsp of vanilla instead of 2. What the heck, since this whole ensemble was pretty much an experiment anyway.
 
Process the nuts and salt in food processor until they look like coarse crumbs. Add the cocoa powder, dates, and vanilla then process until well combined.
Press the mixture into the bottom and up the sides of a loose-bottom tart pan. I think this one is 9 inches, but I could've used an 11-inch tart pan for a thinner crust and it may have turned out better. I then baked it in a 350-degree oven for about 15 minutes.
 

Cool completely before adding the chocolate mousse filling, then chill in the refrigerator until ready to serve. Garnish as desired with, well, anything you want really.
 
I melted 2 bars of white chocolate (Lindtis good stuff) then stirred in some coconut oil so it wouldn't set up quite so firm, and allowed it to cool until it was thick enough to pipe some oversized rosettes around the tart's top edge. I wouldn't call this creation a total failure, as it's certainly edible, but the crust fell apart as soon as I sliced into it, which was disappointing, and the mousse not being totally smooth really bugs me.


Chocolate Mousse on FoodistaChocolate Mousse

Wednesday, December 29, 2010

Truffles (Dairy Free)

I recently found a dairy-free chocolate truffles recipe in The New InterCourses: An Aphrodisiac Cookbook.Rather than having to melt chocolate and heat cream, these are quickly and easily made in a food processor. My only issue is that the recipe calls for almond pie filling. I assume they mean almond paste, right? I haven't been able to find almond pie filling anywhere.
I made two batches, one with hazelnuts and the other using almonds. They both turned out yummy, and the taste difference is pretty slight. Even when using hazelnuts the almond extract and paste still give these an almond flavor.

Ingredients

1/2 cup whole almonds or hazelnuts, toasted (hazelnuts pictured)
4 ounces high-quality bittersweet chocolate
1 tablespoon almond pie filling (no clue, so I used almond paste)
1/8 teaspoon almond extract (I just dumped it in with the liqueur)
1 tablespoon strong hot coffee (which is not pictured below as it wasn't yet made)
1 tablespoon hazelnut liqueur
Toast the nuts and allow them to cool, then chop them in a food processor until coarsely ground. Remove half and set aside. Add the chocolate to remaining nuts and process until finely ground. Add the almond paste and extract, and process until the mixture starts to come together.
Add the coffee and booze while the food processor motor is running, and process until the mixture becomes slightly thinner and smoother. This mixture will need to chill in the refrigerator for an hour firm up.
  
Then, just roll it into balls, dredge them in the ground nuts, and they're ready to eat. Here is where having colds hands is helpful. I also dredged some of these in cocoa powder, but I ate all of those before I got around to taking pictures of the finished truffles. Also, I apologize for not having any pictures of the assembly process.
 
Inside their texture isn't quite as creamy as traditional truffles, but it's still pretty smooth. Keep these in the refrigerator, but don't plan on them lasting long.
I also made a Chocolate Torte Dressed in Berries from The New Intercourses, and it turned out delicious as well. The whole idea behind this cookbook is that the recipes all contain aphrodisiac ingredients. While there are some lovely pictures in it, none of the photos are of the finished recipes. I don't know why. I kind of like to know what I'm going for when making a new recipe. But, I've been very happy with the recipes I've tried so far.

Wednesday, November 3, 2010

Baked Oatmeal Redux

Sometime last year, I posted a recipe for vegan baked oatmeal. This is easily one of my favorite things to have on hand because it's so versatile and can be enjoyed year-round. I make it in the summer when we have freshly picked blueberries, but it works equally well with frozen.


The only trouble is that the original recipe was rather long and involved--not that I wasn't well rewarded for my efforts, but it's nice to have some quick and easy recipes for things I find myself making on a regular basis. Well! Recently I saw a revamped version of the baked oatmeal recipe that's also vegan, dairy-free, and can be made gluten free, only this recipe is much easier and replaces the sugar with maple syrup. Also, the original recipe calls for 1/2 cup of peaches and 1/2 cup blueberries, but I use a cup of blueberries because I typically have other plans for my peaches. This version is a bit sweeter than the original recipe, so you may want to scale back the amount of maple syrup.

Baked Oatmeal Redux:

3 cups quick-cooking oats
3 tablespoons finely ground almonds
2 teaspoons baking powder
1/2 teaspoon cinnamon
1/4 teaspoon ginger
1/2 teaspoon salt
1 cup maple syrup
1 2/3 cup almond milk
1 cup blueberries (I used frozen this time because that's what I had)

Before you do anything, preheat the oven to 350 degrees, spray a 9-inch square baking dish with nonstick spray, and assemble the ingredients. Mise en place, s'il vous plait.


In a large bowl, combine oats, ground almonds, baking powder, cinnamon, ginger, and salt. I also added some freshly grated nutmeg. I love freshly grated nutmeg.


In a separate bowl mix the almond milk and maple syrup together, then add to dry ingredients.

Stir until just combined, and then fold in the blueberries.


Pour it all into the baking dish--don't worry if it looks a bit soupy.


Bake at 350 for around 40 minutes or so, and this is what you get. 

A yummy snack.
Warm with almond milk.
Along with the cooler weather comes my desire for comfort foods, and this one tops my list of favorites. I like to eat it warm with some almond milk for breakfast, I can have it cold as quick snack, and it makes a yummy dessert when topped with vanilla coconut milk ice cream.