Have I mentioned how much I love the Whole Foods recipe iPhone app? My most recent experiment was based on the
Apricot Tart in Quinoa-Almond Crust recipe I found on there, which is also available on the
website.
I had some leftover quinoa flour I needed to use up, so this seemed like a good recipe to try. Of course, I was missing a few of the key ingredients, namely evaporated cane juice and apricots, so instead I made some ganache with coconut milk and dark chocolate for the tart filling and used the pastry cream as a topping. I'm always in the mood for chocolate.
It worked out pretty well, except I used
Rapadura to make the pastry cream in lieu of evaporated cane juice, and it gave the pastry cream a horrible greenish-brown mud color. So I called it a mud pie. I don't have step-by-step photos for this recipe because I made the ganache and pastry cream after dark, ad you guys already know about the lighting issues in my kitchen. Plus, how the heck am I supposed to take pictures while making pastry cream? That stuff requires both hands and due attention. Anyway, here is the recipe as I made it.
For the crust:
1 cup
quinoa flour
1/2 cup almond flour (I used
Honeyville)
1/4 cup sugar
1/2 teaspoon xanthan gum
1/4 teaspoon salt
1/2 cup (1 stick) unsalted butter, at room temperature and cut into small pieces
1 egg yolk
Place quinoa flour, almond flour, sugar, xanthan gum, and salt in the bowl of a food processor. Add butter and process until the mixture resembles coarse meal, 8 to 10 seconds.
At which point, mine looked like the photo on the left, so I processed it a few more seconds, until it looked like the picture on the right.
Add egg yolk and pulse until dough holds together, without being wet or sticky. That's what the recipe says, anyway, but mine stayed a little sticky.
Flatten dough into a disk on a sheet of wax paper, then wrap it up and let it chill for at least an hour.
When well chilled, roll dough into a 12-inch round on a lightly floured surface (I used what little quinoa flour I had left for this). The dough was still a bit sticky and tricky to work with, and I had trouble with it falling apart as I tried to put it in my 9-inch loose-bottomed tart pan, so I ended up pressing it in the pan. It then needs to chill for another 30 minutes before baking at 400 degrees for 15 minutes, or until bottom is dry and tart shell is golden brown. The recipe says to prick the bottom with a fork, which I did, but I didn't use any pie weights. Allow crust to cool completely before adding filling.
While it's cooling, you can make the ganache and pastry cream. The ganache is easy, just melt a bag of dark chocolate chips, I used
Ghirardelli 60%, add a can of coconut milk, and stir until smooth. Let it chill in the refrigerator, and it will thicken up nicely.
The pastry cream is a little more involved, but well worth the effort. I used:
1 cup
almond milk
1/4 cup
Rapadura
2 egg yolks
2 tablespoons cornstarch
1/4 teaspoon pure almond extract
1/4 teaspoon pure vanilla extract
1 tablespoon butter
Over medium heat, stir almond milk and 2 tablespoons of the Rapadura in a small saucepan until it starts to simmer. In another bowl, whisk the egg yolks, remaining Rapadura, and cornstarch until pale yellow. Slowly add half of almond milk to egg-yolks, whisking constantly. This tempers the egg yolks so they won't curdle. Pour everything back into the saucepan. Still working over medium heat, bring the mixture to a boil while whisking constantly. Once the mixture comes to a boil, continue whisking vigorously until it thickens, about 1 minute. Remove pan from heat and stir in almond extract and butter. Allow it to cool completely. Like I said, my pastry cream isn't the most appetizing color, so I think next time I may try making this recipe with maple syrup instead of the Rapadura.

When everything is cooked, baked, and cooled--in my case the following morning so I could have enough light to take photos--then fillings can be added to the tart crust. Since the chocolate was a lot thicker and heavier than the pastry cream, I spread that on the shell first, then added the pastry cream as a topping. Yum.
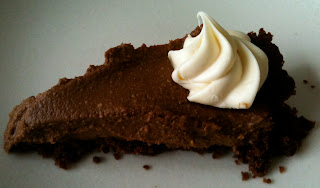
Here are more photos of the crust and filling once the tart had chilled for a while after the final assembly. Apart from the odd color of the pastry cream, I'm really happy with how this recipe came out. The crust is more like a cookie base than a flaky pastry, as one would expect with a fruit tart, which this was intended to be. The pastry cream is light and sweet, very similar in consistency to pudding, and the chocolate is awesome.
I won't lie, the quinoa flour does leave a bit of its flavor behind. It's not so much an aftertaste as more of a flavor undertone, but if you didn't know the quinoa flour was in there you might not even notice it. I'm glad I tried this recipe, as I think the crust could be used with a variety of sweet fillings. I may try it again with a different flour and see how it does.


 is good stuff) then stirred in some coconut oil so it wouldn't set up quite so firm, and allowed it to cool until it was thick enough to pipe some oversized rosettes around the tart's top edge. I wouldn't call this creation a total failure, as it's certainly edible, but the crust fell apart as soon as I sliced into it, which was disappointing, and the mousse not being totally smooth really bugs me.
 Chocolate Mousse


