Showing posts with label sweet wise. Show all posts

Sunday, January 30, 2011

Should've Done Sunday: Fondant Fail

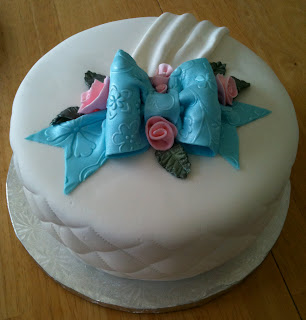
This week's Should've Done Sunday isn't a cake from years ago. Today I'm sharing a more recent effort, as I only just made this cake last weekend. It's not the fondant that failed. It was me getting in a hurry and trying to cut corners. I don't feel as though this cake is representative of my skills, as I can do much better, so I'm using it as a learning experience and thinking about what I should've done while it's still fresh in my mind.
Local cake enthusiasts already know about Mecca Sweet Wise, a cool cake decorating supply store. They sell everything cake decorating related, or just about. They also have classes there. Really, really awesome classes. I subscribe to the email newsletter, so I found out late last week that a Fondant II class was scheduled for Saturday afternoon, but I was teaching my own cake decorating class that morning, and I figured it would be too much of a push to get a cake ready and everything else together. Besides, there were 2 other dates for Fondant II, so I figured I'd just take it later.

The thing is, I couldn't attend the February Fondant II class, and that meant I'd have to wait until March to take it. That was way too long for me. I'm not a patient person at the best of times, so I decided to go ahead and do the class last weekend. This meant I had to bake a cake last-minute, so it was a Duncan Hines job, not from scratch. The trouble with cake mixes is that they often produce cakes that are so light they don't always hold up under the extra weight when covered in rolled fondant. I know, there are ways to "doctor" them, but I was rushed and really was only thinking that I had to get a cake made ASAP.

I waited until after I got to Sweet Wise to ice and cover my cake with fondant, which wasn't that big of a deal because I arrived early for that purpose, but the cake wasn't cooperating. I froze it overnight, but it spent all morning in the van while I was teaching my class, and it was a sunny day so the van was warm. Icing a less-than-cold cake is a drag, in more ways than one. Normally that's not a huge problem because once the whole thing gets covered in fondant nobody knows what the crumb coat underneath looks like, but it was still frustrating.

Also, I didn't take time to level the layers. They were pretty flat anyway since I used my trusty Bake Even Strips, but I did the trick where you position the tops against each other in the middle. That probably would have been fine, except I forgot to gently press the top of the cake before icing it. As the cake settled, especially with the weight of the fondant, it created that inner tube effect around the middle of the cake where the icing between the layers bulged out.


For some reason--I blame Wilton brainwashing--I was convinced I had to have the cake on a board-to-size before putting it on the silver cake base. The trouble was that I baked an 8-inch round cake but only had 7-inch round cake circles, so that's what I had to use, and it was too small. I knew this, but yet I still attached the cake to it. This, my friends, is what happens when there's not board underneath to support the fondant. It sags there around the bottom where the cake is higher than the board. I tried tucking it under, but that actually seemed to make it worse. I didn't have time to make a bottom border that would cover it up, so I know it's not pretty.
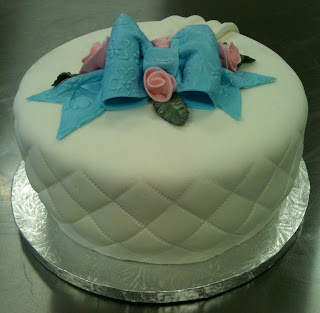
I did okay on the quilting job, but I was feeling rushed and a bit flustered at this point, so there are places where I messed up. To add insult to injury, I somehow managed to stick my thumb in the side while I was working with it. I already embossed the sides, and the fondant had started to dry enough so that I couldn't smooth it out.


I'm happy with the bow, but I hate that the left ribbon tail is so much longer than the right. I didn't even notice that until I got it home and tool pictures. I also wish I'd done a better job of centering it. The green I used on the leaves isn't ideal for the blue and pink, but it's the only green luster dust I have. It looks much better with ivory roses, trust me. The fabric swag is okay, but I wish it was positioned better. We were really just learning how to make them, and at that point I just stuck it on the cake without really thinking about the bow, roses, and where it all should go.


So, taking the above into consideration, and understanding that there's always room for improvement, here are my thoughts on what I should've done to make this cake better:
  • Had the cake already iced before leaving the house. This is probably the biggest thing, as it would have either eliminated or alleviated some of the other issues and given me more time to cover my cake in fondant.
  • Trimmed the cake tops so the layers were completely flat against each other when I stacked them. That would have prevented the spare tire. Oh, and I should've remembered to push the layers together so the filling would settle.
  • Not messed with the dang cake circle underneath. That was a useless waste of cardboard. There's no reason I couldn't have this cake sitting directly on the silver cake base.
  • Been more patient when doing my quilting on the sides and more careful when imprinting the pattern.
  • Paid more attention to the bow tails' lengths and made them at least a little more even.
  • Borrowed a more suitable color of green luster dust for the leaves.
  • Planned out where I was going to place everything better and centered the bow.
  • Bought the floral imprint mat I used to make the bow. I seriously love it, and it wasn't that expensive. Now I really wish I had it.
  • I'll concede: I should've taken the time to put at least a bead border around the bottom before taking a picture and posting it on my blog.
At the end of the day, it's still a decent-looking cake. I'm not trying to be overly critical and nit-picky, but that's my work, and I consider myself a professional, so I need to have high standards. It's all in the interest of promoting excellence in cake decorating, you see. So with that in mind, what else could I have done differently to make this cake better?

Monday, December 20, 2010

Holiday Treats - Basic Cookie Dough

There's a really cool cake decorating supply store in Nashville called Sweet Wise. They have an enormous selection of cutters, candy molds, cake pans, and all that groovy kind of gear. They also offer classes, and the owner has a blog where she posted this recipe for her basic cookie dough. This dough can make classic roll-out cookies in addition to four other treat ideas, so I decided to try it.

I didn't have the almond oil essence or whatever it called for, so I used 1/4 teaspoon of pure almond extract instead. Also, these aren't gluten free because they aren't for me. In fact, probably any recipes I post between now and the end of the year will be for holiday treats, which most likely won't be a healthier redux or gluten-free. Hey, it's the holidays, after all, and this way I won't be tempted to eat them.

Ingredients:

1 1/4 cups (2 1/2 sticks) butter, softened
2 cups sugar
2 eggs
1 1/2 teaspoon Vanilla Extract
1/4 teaspoon
5 cups all purpose flour
2 tsp baking powder
1 tsp salt
1/2 cup milk
 Combine flour, baking powder, and salt in a bowl and set aside.
Cream butter and sugar in mixing bowl until fluffy.Add eggs and flavorings and mix well.
 
Add the dry ingredients a little at a time, alternating with the milk until all have been incorporated. Now, the recipe doesn't say to chill the dough before use, but I made mine a few days ahead of time. Rather than roll the dough into a ball, I prefer to divide it in half, and pat it out into a flat round between wax paper. That way, I can store it flat in the refrigerator until I'm ready to use it, and it's already half-way rolled out.
 
When ready to use, roll out the dough 1/4 inch thick, cut into desired shapes, and place on baking sheets lined with parchment paper. Bake for 9-11 minutes, or until just starting to brown on the edges, in a 375 degree oven. Allow to cool completely before decorating.

Now, whenever I have to roll out any kind of dough, I really prefer to roll it out between sheets of wax paper. This saves flour and mess.
 
But that doesn't work with this dough. No matter how chilled it is, it sticks to the wax paper, and it's really too soft to hold its shape when baked. This recipe tells you to roll out the cookie dough on a floured surface, and it definitely needs that floured surface. The flour gets worked right into the dough and makes it easier to handle, and the dough holds its shape much better.
 
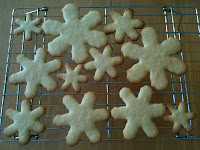
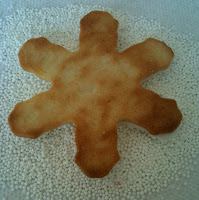
I used 1/4-inch spacers on my rolling pin and cut some snowflakes with my nesting snowflake cutters. The smaller ones bake more quickly. I finally wised up and started pulling them out of the oven a minute or so early, but quite a few got over baked before I figured this out.
 
I have some new rolled fondant I've been wanting to try in addition to some buttercream so I decorated the snowflakes a few different ways.
Some just got covered with rolled fondant and made into a snowflake tree:
  
This is actually really easy, as it uses the same cookie cutter you used to make the cookies. Just smear some buttercream on top of the cookie--this doesn't have to be pretty as it's only there to make the rolled fondant stick.
Pinch off a good handful of rolled fondant and knead until soft and pliable. Roll out the fondant to desired thickness, I used the 1/16-inch spacer rings on my little rolling pin, but you can roll it out thicker if you want. Use the cookie cutter (after washing) to cut out a piece of fondant the same size and shape as the cookie.
  
Then it's just a matter of positioning the fondant snowflake on top of the cookie, and it's ready to go. You can leave them separate or stack them.
I realize that looks pretty plain, but sprinkles can help. I prefer to pour them onto a paper towel and spread them evenly out to an area as large as the cookie I'm working with. That way, when I'm done I can pick up the ends of the paper towel and funnel them into a plastic bag to save for later.
  
To add some outline sparkle to the snowflakes, I piped buttercream around the top edge of the cookie with a #3 tip. This doesn't require precise piping skills since the piped lines will be covered up with the sprinkles sticking to them. Once you have the buttercream outline piped, go ahead and plant the cookie face-down in the sprinkles, because they'll stick MUCH better while the icing is fresh.
  
You can then add more icing to the center and dip the cookie again... 
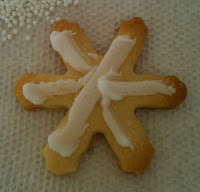
Or not even bother with the fondant, and just pipe some buttercream directly on the cookie top and dip it into sprinkles.
 
 The smaller snowflakes are just the right size for that sort of treatment. Here are some more I made.


I'll need to talk about the other cookies I made with this batch of dough later because I haven't finished those yet.