Showing posts with label rolled fondant. Show all posts

Thursday, April 19, 2012

Minecraft Diamond Ore Cake

Minecraft is very popular at our house, and for my older son's recent birthday we made a diamond ore cake. In case you don't know what they look like, or can't be bothered to follow the link to Minecraft Wiki, here's what we were going for:

When it comes to projects like this, I like to see if I can find somebody else who has managed to make something similar, so I can pretty much just do whatever they did since it seemed to work out for them. Like I needed another excuse to browse around Pinterest, right? While I didn't find a diamond ore cake, I discovered a couple of different dirt block cakes: one is exceptionally well done with thousands of little rolled fondant squares, and the other is more simple, made by YouTuber MincraftChick. I also found these Minecraft Cake cupcakes, which I think are lovely.


Making a cake that's a cube shape was easy enough, we just used three 8-inch square cake layers. Since they're between 2 and 3 inches tall each, stacked up they looked enough like a cube. We decided to add an extra level of fun and color the cake layers themselves gray with blue flecks, so that when you cut into the cake, it looked like diamond ore, not cake. This didn't work out so well, as the blue sprinkles I planned to use (like funfetti) dissolved in the cake batter and turned it an awful blueish gray.

I used Duncan Hines Classic White cake mix and added around 4-5 drops of Super Black food coloring to make the layers gray. We then sandwiched them together with gray-tinted buttercream and a generous layer of the blue sprinkles.

We were going for a marbled gray rolled fondant to cover the cake with, but by the time I got it rolled out large enough, the color was pretty thoroughly mixed in. We tried embossing the square pattern on the top and sides of the cube, and that looked okay, but we ultimately opted to add rolled fondant squares in gray and various shades of blue all over the cake. I'm pleased with the results.
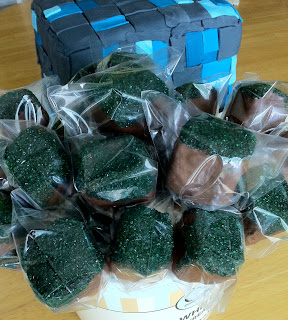
To go along with the diamond ore cake we made dirt block treat pops. These are like cake pops, only made with rice cereal treats instead of cake. They're much easier and quicker to make, as they don't require multiple steps of chilling, and it's a firmer mixture to shape. These we dipped in chocolate bark coating and then dipped the tops in green sanding sugar.
We also constructed a pickaxe out of the rice cereal treat mixture and covered it with chocolate bark coating on the handle and white candy melts on the blade part.
Sadly, I neglected to get any pictures of the cake after it was cut so you could see all the gray goodness inside. One of the layers turned out just a shade or two darker than the others, as is typical. It's so hard to match colors exactly when you try to remix them.

Thursday, April 12, 2012

Wired Gum Paste Rose Leaves and Bouquet

The point of having gum paste roses (or any flower, for that matter) on wires is so that you can make an arrangement by taping them together with floral tape. Otherwise, you can just make them on toothpicks or pieces of uncooked, thick spaghetti. This means if you want to have any leaves in your bouquet, then they also need to be on wires. I show you how to do it in a tutorial I posted on CakesDecor.com, complete with pictures and instructions.

I posted several tutorials on that website because they were having a contest, you see. And these are all things I've been wanting to post here on my blog, but my efforts get more traffic and exposure over there. Plus, I think it's a pretty cool place for cake decorators to hang out, and there are many more tutorials posted that cover a wide range of cake decorating skills and techniques.

Once your leaves and flowers are all made, you can have a lot of fun and get really creative with petal and luster dusts to add some color and shimmer to really make your flowers look impressive. Then, you just attach them together with floral tape. I can be am very clumsy, and these petals and leaves are fragile, so I like to work over a kitchen towel. I still break stuff, which is why it's always a good idea to make extras, but at least if anything slips from my fingers it will land on a somewhat soft surface instead of shattering as soon as it hits the table.

Below is the full playlist showing how to make wired roses and leaves, as well as how to paint them with luster dust and tape them together in an arrangement. I have more cake decorating videos posted on my YouTube channel, including a few on how to pipe flowers using petal tips and a flower nail.


Friday, March 9, 2012

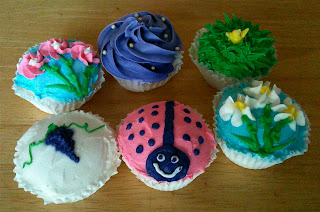
Luau Tiki Men Cupcakes

Every year about this time the Scholastic Book Fair comes to my kid's school. For an entire week, the library turns into a book store, all decked out according to the theme. This year it's a Luau.

I'm happy to support the book fair because it benefits the school and encourages kids to read. I've even picked up some choice finds in years past. That's where I acquired Hello, Cupcake! and What's New Cupcake? but I was really excited to see Bakerella's Cake Pops book on the shelf this year.

I volunteered to bring sweet treats, and since I've been telling everybody to buy Bakerella's book I probably should've made cake pops. I thought about trying to make little tiki men shaped cake pops, but I wasn't convinced it would work, and cake pops take a lot of time.

So I decided to make mini cupcakes. You can usually get at least 72 out of a box of cake mix, so they're great for feeding a crowd. I used a box of Duncan Hines Confetti cake mix and got 78 micro cakes. I only have one mini-muffin pan, so I had to bake the batter in batches, but that gave me time in between to work on the decorations.

Not really sure how to decorate them, and totally lacking imagination, I went with the design printed on the book fair flyers. Here's what I was going for. Or, at least something similar.
To make the tiki men, I formed chocolate fondant into a log shape, and then rolled it into a snake. I then cut it into (roughly) 3/4" segments. It's best to work on them one at a time, and you'll need to keep the spares covered so they don't dry out before you get to them. Using modeling tools, my assistant and I made tiki faces in each segment and left them to dry. We used a dog bone tool (small end) to make the eye indentations, a pointed modeling stick for the eyes, the thin end of a veining tool to make the nose, and a small spatula to make the forehead marks and mouths. But really, you could do all that with the tip of your pinky, a toothpick, and a pointy spatula. I also posted a tutorial demonstrating how to make these on CakesDecor.com
I also made small green leaves and blossoms out of a gum paste and pre-colored rolled fondant blend using plunger cutters. The blossom centers are sugar pearls, and I used an angled offset spatula to make small vein marks on the leaves. These can be made days in advance.
To assemble, I piped white buttercream on the top of each cupcake, using a tip #12 on some and a tip #21 on the others. Immediately after, I dipped the cupcake edges in brown sugar to look like sand. Again, it's best to work with them one at a time so the icing doesn't crust before you get the cupcake edges dipped in the brown sugar. Also, sometimes brown sugar is sticky and likes to clump up, depending on the humidity. If that's an issue, mix in some regular sugar to help break it up. Then, I positioned a tiki, some blossoms, and a couple of leaves on the top.
I figured out, quite by accident when I got a glob of buttercream on a tiki and then wiped it away, that you can highlight the features and details by smearing a little icing across it. This white buttercream makes a nice contrast on the chocolate fondant. But, I didn't really have the time to do them all that way, so I left the rest plain.
Since these are mini cupcakes, they might be a bit top heavy, especially the ones that get a little more full because their tops are bigger. Also, some of the tiki men wanted to lean, so the blossoms and leaves help prop them up.
The thing about making the tiki guys by hand is that they all come out looking a little bit different, and they were so much fun to make! I have more pictures, possibly with an obscure reference or two, posted on photobucket.

Pin It

Saturday, March 3, 2012

Gum Paste Carnations--Not on Wires

Since I posted a a tutorial on how to make gum paste carnations on floral wires, which is how I originally learned to make them, I thought I might as well also post one on making wireless gum paste carnations.

This is similar to how they're made in Wilton Course 3, only I prefer to use a scalloped cutter as opposed to a plain round cutter, and I use a different frilling method. As with the wired carnations, you need to make the bases first and wait until they're completely dry before adding the petals. I think it's easier to add the calyx before building the flower because the carnation petals are fragile, and I always break a few petal edges when I put the calyx on last.

Anyway, here's the link: Gum Paste Carnations (not on wires), and while you're on the CakesDecor.com website, check out some of the other tutorials. There have been quite a few fun ones added.


Pin It

Sunday, February 26, 2012

Wired Gum Paste Roses

In addition to posting a tutorial on how to make wired gum paste carnations, I also did one on making wired gum paste roses. You can see the whole thing on CakesDecor.com. Below I have the relevant videos embedded, as well as photo slideshows.


Pin It

Friday, February 24, 2012

Wired Gum Paste Carnations

Thanks to the wonderful world of the Internet, there's a wealth of resources at out fingertips. From Google searches to online communities, you can find instructions and information on nearly anything you may want to know about or learn how to do.

I recently posted an online tutorial on how to make wired gum paste carnations on cakesdecor.com. They're actually having a tutorials contest, so if you'd like to share a technique, feel free to participate. You can see my How to Make Carnations on Wires tutorial there, and I also posted three videos on YouTube.

The first shows you how to make the flower bases, which need to dry completely before proceeding. The second video shows you how to make the petals and build the carnation, and then the third video is about how to add a calyx to finish it off.


 Oh, and here's the Photobucket slideshow of all the pictures.


Pin It

Saturday, November 19, 2011

Those New Wilton Punches

Earlier this year, Wilton released a new product line called Punch.Cut.Decorate! that consists of punch cutters like the die cutters used in scrapbooking. The companion product, Sugar Sheets, are very thin, edible "paper" you cut with the punches, available in a variety of colors and patterns.
There are two basic punches: an oval and wavy line. But you can then get different inserts that cut other shapes. You may have seen the swanky new product display in the Wilton aisle of your favorite craft store. I mention it because I think these type of decorating tools might appeal to crafters who have previously been intimidated by cake decorating, as this is really more like scrapbooking and paper crafts. You're just using edible sugar paper and food-safe punches.
The potential for creativity here is huge, and I can see how these products will open up the world of cake decorating for a whole new market. At least, I suppose that's what Wilton hopes will happen. Instructors got a sneak preview of the product line at our annual meetings, and we got to take a set of the basic punches home with us along with a sample pack of Sugar Sheets, which was awesome!
We were supposed to showcase the new products in our Wilton classes for a period of time, so I got some practice using the punches with Sugar Sheets. I didn't have much luck with the Sugar Sheets. I had a hard time getting them to cut cleanly, and after a while--even though I kept them sealed up--they started to dry out. When Sugar Sheets get dry, you can't fold the shapes you cut or they'll crack.

While I think the vast majority of instructors are very excited about these new punches, I lack enthusiasm. I try to be open minded, and I normally love learning new tricks and techniques, but this method doesn't really appeal to me. Maybe I'm too old school. Cake decorating to me involves squeezing icing out of a piping bag, texturing rolled fondant, or making gum paste flowers.

Plus, have you seen the price of the Sugar Sheets?! And you know, the punches aren't free. I'm not able to invest in a whole new round of equipment, and besides, I don't have the storage space. Now that I'm out of Sugar Sheets, I was hopeful that the punches would work with wafer paper, as that's much more affordable. But they don't.
So, I tried them with some rolled fondant, and they did fairly well. I think using gum paste or at least a half-fondant/half gum paste mix might work better. The fondant was a bit too soft and stretching was an issue, but not a huge problem.
Here's a close up of the roses and wee crown I made using shapes from the wavy cutter. The oval cutter made the bow loops and rather-too-large-to-be-whimsical butterfly. Or whatever you think it looks like.

I feel as though I'm still in the process of getting used to these tools, and I'm not quite as comfortable with them as I'd like to be. However, even though they're not be my favorite tools to work with, some of my students love them and have had a lot of fun getting creative with the shapes.

Friday, July 15, 2011

Gluten Free Week at The Sugar Turntable

Next week, July 18-22, will be Gluten Free Week at The Sugar Turntable. This is a cake decorating blog that features recipes, project ideas, and video tutorials. Kathryn owed a wedding cake business for four years, and her cake portfolio is very impressive.


But what I think is really awesome are the videos. Of particular interest may be the ones on how to crumb coat a cake and cover it fondant. There's also already a recipe up for gluten-free chocolate cake that I'm going to try at some point, so watch for that post. In the meantime, plan to stop by thesugarturntable.com next week and see what all she has to share.


Sunday, May 8, 2011

Should've Done Sunday: Mother's Day Debacle

Actually, I may have made this cake for a birthday, but I was trying to replicate the design of a Mother's Day cake pictured in one of my cake decorating books. It's one of the first cakes I covered in rolled fondant. I was living in the UK at the time and enrolled in a basic sugarcraft course, but I had only ever used buttercream or some other type of frosting to ice a cake, so this was totally new to me.

Rolled fondant has since become very popular over here in the States, but it's not as readily available. When I made this cake nearly 14 years ago, I covered it with Regal-Ice, which I bought (comparatively cheaply) from the local grocery store. Here in the US, we have to either order off the internet or go to specialty cake decorating supply stores to get decent rolled fondant. I don't know if we'll ever see tubs of Satin Ice on the shelves at Publix.
Anyway, for this cake, not only was I a rolled fondant beginner, but I obviously had no clue what I was doing with the piping either. I vaguely recall just kind of making it up as I went along. Not that there's anything wrong with that, but this is another picture that makes me cringe. However, I had a lot of fun decorating this cake, and I think I was at least minimally proud of it at the time, and that's ultimately what matters. Like with art, I believe it's more about the process than the product. Especially when you consider that unlike art, in cake decorating the product gets eaten.

Oh, and I apologize for the poor picture quality. I made this cake long before I had a digital camera, so these are old fashioned, had-to-get-the-film-developed photos. At some point I thought them worthy to be included in my cake scrapbook, hence the awkward cropping. To post here, I had to use a scanner, and unfortunately, they came out a bit crooked and washed out.

This Should've Done Sunday cake has a small cluster of hand molded sugarpaste roses in the center. They're brushed, rather ineptly, with petal dust for color. Along the sides of the cake are some blossoms I made using my plunger cutters, and they also divide sections of the top border. I'm not sure what I was thinking with that. I was apparently trying to so some sort of overpiping, but I have no clue why I chose those colors. It also looks as though the icing is too thin, or something. The bottom border is the result of me trying to make shells before I knew how to make shells. I then topped off the uneven mess with stars. There was some space left on the cake board, so I filled it in with blobs. I guess I didn't feel like it was really cake decorating unless I squeezed a lot of icing out of a bag.

Just for comparison, here's what I was going for.
Obviously the colors on mine are all wrong, and I had no idea how to make fondant swags or bows, so I opted for overly-busy mystery borders. The cake pictured in the book is simple, and much more elegant than the one I made. Here's what I should've done with mine:
  • Used only one or two colors. I don't know why there's such a mess of mismatched hues, unless I was struggling with matching the icing colors, which is why you always need to color enough icing to do the job. If you run out, trying to match that exact color is a nightmare. 
  • Left off the top border. You can't really tell in the picture, but the edge is crimped, and then there's a mess of piping on top of that. I'd still do the crimping, but that's all.
  • The blossoms on the side are fine, but to make it look more like the cake from the book, I should've had more of them in a continuous swag.
  • The bottom border needs to be smaller and simpler. Properly made shells or a bead border would work, but without the irregular and uneven row of stars on top.
  • The weird pink blobs with green stars in between need to disappear.
I think there were a few wrinkles in the fondant along the bottom of the cake, which is why I piped so much of a bottom border on it. Other than that, I'm happy with how I covered it. I just wish I hadn't made such a wreck out of decorating it. Still, as best as I can remember, it tasted good. That's the cool thing about cake. I doesn't have to be decorated at all, much less well, to taste good.

Thursday, May 5, 2011

Summer is Almost Here!

This post is mainly for the locals, as it pertains to my cake decorating class schedule and some camps I'll be offering in June. Nothing like a little shameless self-promotion on a Thursday, right?

As you may know, I recently started teaching Wilton classes at the Hobby Lobby in Franklin. Right now, those classes meet on Saturday afternoons, and I'm working towards adding an evening class option at that location. I will update my Upcoming Class Schedule page once that's all finalized and official.

I still teach Wilton classes at the Brentwood/Cool Springs Michaels store. At the moment I only have classes scheduled there for Sunday afternoons, but there's another Wilton Instructor at that store who teaches night classes. I'm happy to offer weekday classes at that location if there's enough interest.

The really exciting news is that next month I'm teaching two different cake decorating camps at the Rec Center. These are for ages 12 and up and will meet on Monday, Wednesday, and Friday afternoons from 1:00 - 4:00.

  • Essential Skills Camp meets on June 13, 15, and 17. We will focus on cake decorating basics and working with buttercream icing. Students also learn how to use color flow and royal icing, in addition to more advanced piping techniques.
  • Rolled Fondant Camp meets on June 20,  22,  and 24, and it covers all the basics of working with rolled fondant. This fun and versatile icing is the perfect medium for expressing creativity. Students will learn how to cover and decorate a cake with rolled fondant, as well as how to make simple, hand-molded decorations and flowers. We'll also use a variety of tools to create stunning effects and realistic flowers.
Please feel free to contact me with any questions you may have about the classes or camps. Also, if there is something you're interested in learning how to do, but it isn't listed, let me know.

Sunday, March 20, 2011

Should've Done Sunday: Purple Packages

Years ago I worked in a very busy bakery. I primarily iced cakes for the decorators and set up the wedding cakes. This was back before rolled fondant was such a huge thing, and nearly all brides were still ordering buttercream wedding cakes. I knew how to work with rolled fondant, as did the assistant manager, so it was something the bakery offered, but we just didn't get that many orders for it.

One lady was having a small wedding and wanted a two-tier cake decorated to look like gift packages. I know, you see these all over the place now, and they've become a bit cliche, but back then it was still a relatively new thing. All I had to go on was the size of the cake, and that she wanted the colors to be white, silver, and periwinkle. She may have actually requested lilac. I honestly can't remember now, but it was one of those nonspecific purplish colors, anyway. The thing is, she didn't bring in any kind of fabric swatch or sample of the color, so I had nothing to try and match. Often one of the hardest things about decorating cakes is trying to read the customer's mind.
Here is the cake I decorated for her, and luckily she was thrilled with it. I was just thankful I got it right. Or right enough to please the customer. I had some issues with this cake at the time, so I while it was adequate, I honestly wasn't 100% happy with it.

For the most part, it's a nice, level cake with no serious flaws, and the top tier is centered well. However, there are certainly a few things I'd like to change.

  • I hate the ruffle. All wedding cakes and "french bouquets" that went out of that bakery got this ruffle ribbon thingy pushed under their base. It's just what they did. I personally think this cake would have looked much better without it. Plus, it made the bottom bead border nearly impossible to pipe evenly and straight, but you can't really tell that from the picture.
  • How do you like all that luster dust? Talk about Super Pearl overload! This was back before I truly understood the concept of less is more. This cake is superfluously shiny.
  • I have no idea what I was thinking when I piped those oversized beads around the base of the top tier. Especially since they're obviously wonky. I should've used the same tip I piped the other beads with, then there would be consistency.
  • Speaking of the other beads, what the heck was I thinking putting them around the top of that bottom tier? It's supposed to look like a gift box with a lid, but instead I think it looks more like a square sofa cushion. 
  • I put way too many blossoms all over the cake, and I think they make the whole thing look too busy. Again with the less is more thing. 
  • Now, I remember at the time not being happy with the bow because it was actually really messy at top, but thanks to strategic camera positioning, you can't see it. Also, I think I should've broken up the purple periwinkle and grey silver with white bow loops. 
  • And finally, the front ribbon on the top tier is crooked. Just slightly, I know, and I didn't even notice it at the time, but has haunted me in this photo ever since.
Okay gang, what did I miss? (Like I how address you guys as if I have thousands of readers?) Comment and let me know! (I always say that, yet rarely does anyone do it.)

Sunday, February 6, 2011

Should've Done Sunday: Faulty Fish

Colette Peters is one of the more well-known cake artists out there, and she's been doing amazing cakes for a while, long before Duff and Buddy hit the scene and became famous for it. Many years ago I bought her book, Colette's Cakes, and made the fish cake for my grandfather. It was his birthday, and he liked to go fishing.
This was one of the first shaped cakes I ever made, and while I had worked with rolled fondant before, I wasn't at all experienced with painting it, as is obvious. The cake itself is super easy: just bake a sheet cake and cut the fish's body from one corner to the opposite diagonal corner going down the length. Kind of like an ellipse, only with a tapered end for the head. Then, cover it in rolled fondant, and while the fondant is still soft imprint the rows of scales using the wide opening of a piping tip. The fins and tail are rolled fondant that has been shaped and textured with a veining tool. The mouth consists of two small, skinny rolled fondant snakes, and the eye is a flattened pea-sized ball of fondant with black food coloring painted on top.

That was all simple enough, but still, it's pretty dang ugly, isn't it? Needless to say, my effort came out looking nothing like the fish cake in the book. That's because you're supposed to use blue and silver luster dust to paint it. Only I didn't have any blue or silver luster dust, and back then I had no clue where to get any, so I improvised with what powdered food colors I had on hand. I didn't have very much, and those can be pretty pricey, so knowing there wasn't enough to color the whole cake, I thought I could just dilute them with water and make a paint out of them. Wrong! Always add a clear alcohol to powdered colors and luster dusts when painting fondant or gum paste. But really, this cake should have had dry luster dusts brushed on it.

The paint I made didn't adequately color the fondant. All it did was turn the whole thing into a wet, sticky mess. I tried to remedy this by coloring some piping gel and brushing that on the cake, which resulted in the picture above. The colors all pretty much ran together, and piping gel leaves a translucent, wet-looking finish, so it does look like a fish out of water, just not a very pretty--nor appetizing--one.

When done properly, the Colette Peters fish cake looks like this:
No, that's not another one I made. I found this gorgeous fish cake picture over on Flickr, and it's the work of indigojods. She actually has quite an impressive photo stream, with a lot of really beautiful cake pictures if you're interested in seeing more of her work. The tomatoes are a nice touch, and she modeled them out of fondant. I also like the candy orange slices she used better than the chunky ones I used around my cake.

Nowadays luster dust is easy to find at specialty cake decorating supply stores or online. Wilton even makes some that you can buy at craft stores that carry their products. So, while I certainly should've used the right kind of luster dust, that wasn't an option available to me back then. Instead of piping gel, I should've either colored the fondant before covering the cake by kneading some food coloring into it, OR done a bit more research first. Winging it often gets the job done, but I didn't need to figure out the importance of using clear alcohol to make paint the hard way. I also think the piping gel was a mistake, but after my paint debacle, I had to do something to cover up the nasty wet fondant. But still, since it was a cake for family, nobody complained.

Oh, and um... if I really want to be nit-picky: I should've lined up the scales better. They get a bit wonky in places, and that bugs me. I'm ambivalent about the leaves. I was trying to make them look more like seaweed, so I striped the piping bag with darker colors, but I think I went too dark in places, and the leaves themselves aren't all that great. But they're really no worse than the fish.

Monday, January 31, 2011

My Other Display Samples

I know I was supposed to post pictures of the other display samples I made for the Art Sparks event before now. The thing is, I procrastinate, and so I ran out of time and didn't even get two of the dummy cakes decorated--although they are iced. I had grand visions of setting up an awesome table to promote my cake decorating classes, snapping a few photos of it to impress everybody, and then posting all about it. That didn't happen. Despite arriving with a good 45 minutes to set up, I didn't have a chance to take a picture of my booth. Honestly. I was busy the entire five hours because everybody wanted to decorate a cookie or cupcake. Some folks opted to do both, which I suppose I shouldn't have allowed, but there ended up being plenty for everyone and I even had a few left over.
Apologies for the glare on this.
Technically, since my clases are for teens and adults, the cookies and cupcakes were for ages 12 and up to decorate. However, this was a family-friendly event, and while I did my best to encourage the moms and dads to decorate a treat for their kids, I wasn't able to stick to that policy very well. I also really wanted to take pictures of cookies and cupcakes the visitors to my station decorated, but I didn't have a spare moment. There were maybe three very brief lulls, but I had to use that time to quickly reorganize and try to get things tidied up as much as possible. Whenever icing, sprinkles, and kids are involved there is going to be some mess. That just goes with the territory. But it was loads of fun.

I would like to thank Publix for providing the cupcakes, cookies, and icing, and I especially want to thank Roundabouts Cupcake Sleeves for generously sending me enough cupcake wrappers so that everyone who decorated a cupcake had their choice of Valentine's Day themed sleeves, A Tisket, A Tasket, and Tickle the Ivories. I quickly ran out of the candy hearts, so it was the most popular design. I really wish I had pictures, because some of the cupcakes were really awesome.

I had to wait until I got home to take photos of my other display pieces. So, as promised, here they are. I think they held up pretty well considering I didn't so such a great job of packing them to bring back home, and I let people touch them. I also made a white color flow heart with smaller pink hearts on it, but the pink really bled into the white and looked awful, so I threw it away. I'm bummed that a string on the football laces broke off, but other than that these things stayed pretty much intact. I definitely like the laces positioned in the middle of the football as opposed to on the top edge, but I had to try both ways in order to see which would look better. I'm not so great at visualization.
The cupcakes didn't turn out as well as I would have liked. I used some old Wilton rolled fondant to makes these, and they were way too heavy and took forever to dry. Next time I'll just spend the money and get some styrofoam balls or something more practical to use. I meant to pipe little pastel dots around the chick to make it look like he's sitting in a field of Easter eggs, but I forgot. Also, the dark purple grapes bled a little. I'm not sure why, as that's not an issue I've encountered before.
This is actually a cake board I decorated a while ago to put in the display case at the Rec center as an example of what students can learn in Buttercream Basics. Since I'm not scheduled to teach that class again until March, I swapped it out for the cake dummy I decorated to represent Buttercream Flowers. I wish his eye wasn't baby blue, as I think it looks kinda creepy. I should have made it black.
Since Valentine's Day is coming up, I had the obligatory hearts and love cake. Please pretend like you don't notice the dips on the top. They're not entirely my fault, as the styrofoam had some nicks and dips in it, but I still should have filled those in with royal icing before covering with rolled fondant.
I wanted to do a tablecloth cake, but I'm not entirely happy with the bottom border. I probably should've just piped simple beads, but I had already done that on the other two cakes and didn't want to be repetitive. Also, the roses aren't supposed to be a dingy grey color. I think some Nu Silver was left on my brush when I went to apply the Super Pearl. Oh, well. At least I used a better green for the leaves this time.
Here is my redux from this week's Should've Done Sunday. Yes, this cake was entirely inspired copied from my cake I did in the Fondant II class (as were the roses on the cake above). But nobody else knew that.

All in all, it was a great day, and tons of fun. Hopefully this week I'll get around to trying a recipe that's worth sharing.

Sunday, January 30, 2011

Should've Done Sunday: Fondant Fail

This week's Should've Done Sunday isn't a cake from years ago. Today I'm sharing a more recent effort, as I only just made this cake last weekend. It's not the fondant that failed. It was me getting in a hurry and trying to cut corners. I don't feel as though this cake is representative of my skills, as I can do much better, so I'm using it as a learning experience and thinking about what I should've done while it's still fresh in my mind.
Local cake enthusiasts already know about Mecca Sweet Wise, a cool cake decorating supply store. They sell everything cake decorating related, or just about. They also have classes there. Really, really awesome classes. I subscribe to the email newsletter, so I found out late last week that a Fondant II class was scheduled for Saturday afternoon, but I was teaching my own cake decorating class that morning, and I figured it would be too much of a push to get a cake ready and everything else together. Besides, there were 2 other dates for Fondant II, so I figured I'd just take it later.

The thing is, I couldn't attend the February Fondant II class, and that meant I'd have to wait until March to take it. That was way too long for me. I'm not a patient person at the best of times, so I decided to go ahead and do the class last weekend. This meant I had to bake a cake last-minute, so it was a Duncan Hines job, not from scratch. The trouble with cake mixes is that they often produce cakes that are so light they don't always hold up under the extra weight when covered in rolled fondant. I know, there are ways to "doctor" them, but I was rushed and really was only thinking that I had to get a cake made ASAP.

I waited until after I got to Sweet Wise to ice and cover my cake with fondant, which wasn't that big of a deal because I arrived early for that purpose, but the cake wasn't cooperating. I froze it overnight, but it spent all morning in the van while I was teaching my class, and it was a sunny day so the van was warm. Icing a less-than-cold cake is a drag, in more ways than one. Normally that's not a huge problem because once the whole thing gets covered in fondant nobody knows what the crumb coat underneath looks like, but it was still frustrating.

Also, I didn't take time to level the layers. They were pretty flat anyway since I used my trusty Bake Even Strips, but I did the trick where you position the tops against each other in the middle. That probably would have been fine, except I forgot to gently press the top of the cake before icing it. As the cake settled, especially with the weight of the fondant, it created that inner tube effect around the middle of the cake where the icing between the layers bulged out.


For some reason--I blame Wilton brainwashing--I was convinced I had to have the cake on a board-to-size before putting it on the silver cake base. The trouble was that I baked an 8-inch round cake but only had 7-inch round cake circles, so that's what I had to use, and it was too small. I knew this, but yet I still attached the cake to it. This, my friends, is what happens when there's not board underneath to support the fondant. It sags there around the bottom where the cake is higher than the board. I tried tucking it under, but that actually seemed to make it worse. I didn't have time to make a bottom border that would cover it up, so I know it's not pretty.
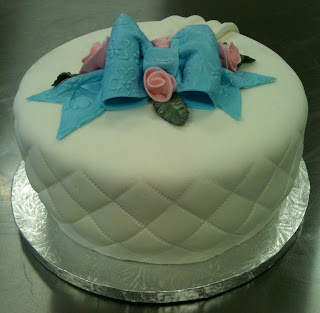
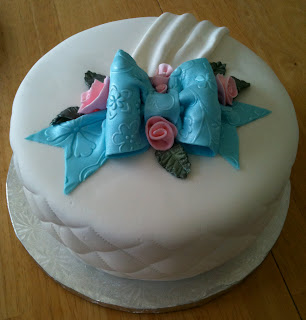
I did okay on the quilting job, but I was feeling rushed and a bit flustered at this point, so there are places where I messed up. To add insult to injury, I somehow managed to stick my thumb in the side while I was working with it. I already embossed the sides, and the fondant had started to dry enough so that I couldn't smooth it out.


I'm happy with the bow, but I hate that the left ribbon tail is so much longer than the right. I didn't even notice that until I got it home and tool pictures. I also wish I'd done a better job of centering it. The green I used on the leaves isn't ideal for the blue and pink, but it's the only green luster dust I have. It looks much better with ivory roses, trust me. The fabric swag is okay, but I wish it was positioned better. We were really just learning how to make them, and at that point I just stuck it on the cake without really thinking about the bow, roses, and where it all should go.


So, taking the above into consideration, and understanding that there's always room for improvement, here are my thoughts on what I should've done to make this cake better:
  • Had the cake already iced before leaving the house. This is probably the biggest thing, as it would have either eliminated or alleviated some of the other issues and given me more time to cover my cake in fondant.
  • Trimmed the cake tops so the layers were completely flat against each other when I stacked them. That would have prevented the spare tire. Oh, and I should've remembered to push the layers together so the filling would settle.
  • Not messed with the dang cake circle underneath. That was a useless waste of cardboard. There's no reason I couldn't have this cake sitting directly on the silver cake base.
  • Been more patient when doing my quilting on the sides and more careful when imprinting the pattern.
  • Paid more attention to the bow tails' lengths and made them at least a little more even.
  • Borrowed a more suitable color of green luster dust for the leaves.
  • Planned out where I was going to place everything better and centered the bow.
  • Bought the floral imprint mat I used to make the bow. I seriously love it, and it wasn't that expensive. Now I really wish I had it.
  • I'll concede: I should've taken the time to put at least a bead border around the bottom before taking a picture and posting it on my blog.
At the end of the day, it's still a decent-looking cake. I'm not trying to be overly critical and nit-picky, but that's my work, and I consider myself a professional, so I need to have high standards. It's all in the interest of promoting excellence in cake decorating, you see. So with that in mind, what else could I have done differently to make this cake better?