Showing posts with label cake decorating class. Show all posts

Thursday, May 5, 2011

Summer is Almost Here!

This post is mainly for the locals, as it pertains to my cake decorating class schedule and some camps I'll be offering in June. Nothing like a little shameless self-promotion on a Thursday, right?

As you may know, I recently started teaching Wilton classes at the Hobby Lobby in Franklin. Right now, those classes meet on Saturday afternoons, and I'm working towards adding an evening class option at that location. I will update my Upcoming Class Schedule page once that's all finalized and official.

I still teach Wilton classes at the Brentwood/Cool Springs Michaels store. At the moment I only have classes scheduled there for Sunday afternoons, but there's another Wilton Instructor at that store who teaches night classes. I'm happy to offer weekday classes at that location if there's enough interest.

The really exciting news is that next month I'm teaching two different cake decorating camps at the Rec Center. These are for ages 12 and up and will meet on Monday, Wednesday, and Friday afternoons from 1:00 - 4:00.

  • Essential Skills Camp meets on June 13, 15, and 17. We will focus on cake decorating basics and working with buttercream icing. Students also learn how to use color flow and royal icing, in addition to more advanced piping techniques.
  • Rolled Fondant Camp meets on June 20,  22,  and 24, and it covers all the basics of working with rolled fondant. This fun and versatile icing is the perfect medium for expressing creativity. Students will learn how to cover and decorate a cake with rolled fondant, as well as how to make simple, hand-molded decorations and flowers. We'll also use a variety of tools to create stunning effects and realistic flowers.
Please feel free to contact me with any questions you may have about the classes or camps. Also, if there is something you're interested in learning how to do, but it isn't listed, let me know.

Sunday, February 13, 2011

Should've Done Sunday: Wilton Wedding

Many years ago, before becoming a Wilton Instructor myself, I was a Wilton student for a few months. This was in 1998, when it was just courses 1, 2, and 3, before they really did much with rolled fondant and long before they added the Fondant and Gum Paste course, which has been relaunched as Gum Paste and Fondant as of last summer. Back then, in Course 3 we dabbled a little in rolled fondant by making a clown face cake using brightly-colored fondant cut-out shapes, but I don't have a picture of it, and it wasn't all that great anyway. We also made a fondant heart cake topper during the second class to use on our final cake, which was a two-tier separated by push-in pillars.
Apologies for the shoddy cropping. I had this photo in my scrapbook and tried to cut out as much of the background as possible. There's really not a LOT wrong with this cake, because I copied it from the back of the student lesson plan, which is evidence of my lack of creativity and imagination, but also was the easy answer since I was working full-time and really couldn't be bothered to come up with anything original.

Anyway, there is a lot going on with this cake, and most of the techniques are no longer taught in the Wilton four-week courses. This is mostly because they're outdated and nobody wants ruffle borders on their wedding cakes now. Thanks to the popularity of rolled fondant and brides preferring more modern designs, string and frills got dropped so that there would be time to teach the latest techniques (that Wilton incidentally had cool new tools for), but still it's a shame.

The hearts on the bottom tier and all the little blue flowers (I think they're forget-me-nots, but I can't remember) were piped with royal icing. The topper is made from two hearts cut from rolled fondant, and in the student kit we got that dinky plastic dove. There were also some plastic beads that we were supposed to attach around the heart, but I piped a bead border with royal icing instead.

The bottom tier also has shell borders and string work, and overall I'm pretty happy with it. The top tier is a six-inch round chocolate cake--which is obvious thanks to the crumbs, grr!--with a shell border around the top and shells with ruffles along the bottom. There were also strings on the sides of this cake, in between the drop beads, but for some reason they didn't stick very well. When I got it back home, half of them had fallen off, so I just took away the rest rather than pipe more. I'm lazy that way.

This was the first tiered cake I ever made, and for the most part it's not too bad. Still, there are a few things that, in hindsight and with the eyes of experience, I should've done. You can probably figure them out, and if you see anything I've missed, feel free to mention it in a comment.

  • I can't remember, but I think I used one box of cake mix for each tier. That's why the top cake is so much taller than the bottom. Ideally, unless you're doing something whimsical, tiers should be uniform in height. I should've either trimmed the layers of the top tier down, or used a box of cake mix for each ten-inch round layer. Thanks to the camera angle, this isn't a terribly obvious flaw, but I know it was there.
  • I should'n't have used chocolate cake on that top tier. See the crumbs showing through? Yeah, chocolate cake is a nightmare to ice with white icing. Unless it's frozen solid, and even then it's a pain. What was I thinking?
  • I really hate the topper. I wasn't crazy about it back then, but I can't stand it now. It looks cheap and cheesy. I should've done something else. Exactly what, I don't know. Any thoughts?
  • I shouldn't have cropped this photo. At least, not like that. 
Okay, so there you have this week's should've done Sunday. Feel free to chime in with anything else I may have missed.

Monday, January 31, 2011

My Other Display Samples

I know I was supposed to post pictures of the other display samples I made for the Art Sparks event before now. The thing is, I procrastinate, and so I ran out of time and didn't even get two of the dummy cakes decorated--although they are iced. I had grand visions of setting up an awesome table to promote my cake decorating classes, snapping a few photos of it to impress everybody, and then posting all about it. That didn't happen. Despite arriving with a good 45 minutes to set up, I didn't have a chance to take a picture of my booth. Honestly. I was busy the entire five hours because everybody wanted to decorate a cookie or cupcake. Some folks opted to do both, which I suppose I shouldn't have allowed, but there ended up being plenty for everyone and I even had a few left over.
Apologies for the glare on this.
Technically, since my clases are for teens and adults, the cookies and cupcakes were for ages 12 and up to decorate. However, this was a family-friendly event, and while I did my best to encourage the moms and dads to decorate a treat for their kids, I wasn't able to stick to that policy very well. I also really wanted to take pictures of cookies and cupcakes the visitors to my station decorated, but I didn't have a spare moment. There were maybe three very brief lulls, but I had to use that time to quickly reorganize and try to get things tidied up as much as possible. Whenever icing, sprinkles, and kids are involved there is going to be some mess. That just goes with the territory. But it was loads of fun.

I would like to thank Publix for providing the cupcakes, cookies, and icing, and I especially want to thank Roundabouts Cupcake Sleeves for generously sending me enough cupcake wrappers so that everyone who decorated a cupcake had their choice of Valentine's Day themed sleeves, A Tisket, A Tasket, and Tickle the Ivories. I quickly ran out of the candy hearts, so it was the most popular design. I really wish I had pictures, because some of the cupcakes were really awesome.

I had to wait until I got home to take photos of my other display pieces. So, as promised, here they are. I think they held up pretty well considering I didn't so such a great job of packing them to bring back home, and I let people touch them. I also made a white color flow heart with smaller pink hearts on it, but the pink really bled into the white and looked awful, so I threw it away. I'm bummed that a string on the football laces broke off, but other than that these things stayed pretty much intact. I definitely like the laces positioned in the middle of the football as opposed to on the top edge, but I had to try both ways in order to see which would look better. I'm not so great at visualization.
The cupcakes didn't turn out as well as I would have liked. I used some old Wilton rolled fondant to makes these, and they were way too heavy and took forever to dry. Next time I'll just spend the money and get some styrofoam balls or something more practical to use. I meant to pipe little pastel dots around the chick to make it look like he's sitting in a field of Easter eggs, but I forgot. Also, the dark purple grapes bled a little. I'm not sure why, as that's not an issue I've encountered before.
This is actually a cake board I decorated a while ago to put in the display case at the Rec center as an example of what students can learn in Buttercream Basics. Since I'm not scheduled to teach that class again until March, I swapped it out for the cake dummy I decorated to represent Buttercream Flowers. I wish his eye wasn't baby blue, as I think it looks kinda creepy. I should have made it black.
Since Valentine's Day is coming up, I had the obligatory hearts and love cake. Please pretend like you don't notice the dips on the top. They're not entirely my fault, as the styrofoam had some nicks and dips in it, but I still should have filled those in with royal icing before covering with rolled fondant.
I wanted to do a tablecloth cake, but I'm not entirely happy with the bottom border. I probably should've just piped simple beads, but I had already done that on the other two cakes and didn't want to be repetitive. Also, the roses aren't supposed to be a dingy grey color. I think some Nu Silver was left on my brush when I went to apply the Super Pearl. Oh, well. At least I used a better green for the leaves this time.
Here is my redux from this week's Should've Done Sunday. Yes, this cake was entirely inspired copied from my cake I did in the Fondant II class (as were the roses on the cake above). But nobody else knew that.

All in all, it was a great day, and tons of fun. Hopefully this week I'll get around to trying a recipe that's worth sharing.

Sunday, January 30, 2011

Should've Done Sunday: Fondant Fail

This week's Should've Done Sunday isn't a cake from years ago. Today I'm sharing a more recent effort, as I only just made this cake last weekend. It's not the fondant that failed. It was me getting in a hurry and trying to cut corners. I don't feel as though this cake is representative of my skills, as I can do much better, so I'm using it as a learning experience and thinking about what I should've done while it's still fresh in my mind.
Local cake enthusiasts already know about Mecca Sweet Wise, a cool cake decorating supply store. They sell everything cake decorating related, or just about. They also have classes there. Really, really awesome classes. I subscribe to the email newsletter, so I found out late last week that a Fondant II class was scheduled for Saturday afternoon, but I was teaching my own cake decorating class that morning, and I figured it would be too much of a push to get a cake ready and everything else together. Besides, there were 2 other dates for Fondant II, so I figured I'd just take it later.

The thing is, I couldn't attend the February Fondant II class, and that meant I'd have to wait until March to take it. That was way too long for me. I'm not a patient person at the best of times, so I decided to go ahead and do the class last weekend. This meant I had to bake a cake last-minute, so it was a Duncan Hines job, not from scratch. The trouble with cake mixes is that they often produce cakes that are so light they don't always hold up under the extra weight when covered in rolled fondant. I know, there are ways to "doctor" them, but I was rushed and really was only thinking that I had to get a cake made ASAP.

I waited until after I got to Sweet Wise to ice and cover my cake with fondant, which wasn't that big of a deal because I arrived early for that purpose, but the cake wasn't cooperating. I froze it overnight, but it spent all morning in the van while I was teaching my class, and it was a sunny day so the van was warm. Icing a less-than-cold cake is a drag, in more ways than one. Normally that's not a huge problem because once the whole thing gets covered in fondant nobody knows what the crumb coat underneath looks like, but it was still frustrating.

Also, I didn't take time to level the layers. They were pretty flat anyway since I used my trusty Bake Even Strips, but I did the trick where you position the tops against each other in the middle. That probably would have been fine, except I forgot to gently press the top of the cake before icing it. As the cake settled, especially with the weight of the fondant, it created that inner tube effect around the middle of the cake where the icing between the layers bulged out.


For some reason--I blame Wilton brainwashing--I was convinced I had to have the cake on a board-to-size before putting it on the silver cake base. The trouble was that I baked an 8-inch round cake but only had 7-inch round cake circles, so that's what I had to use, and it was too small. I knew this, but yet I still attached the cake to it. This, my friends, is what happens when there's not board underneath to support the fondant. It sags there around the bottom where the cake is higher than the board. I tried tucking it under, but that actually seemed to make it worse. I didn't have time to make a bottom border that would cover it up, so I know it's not pretty.
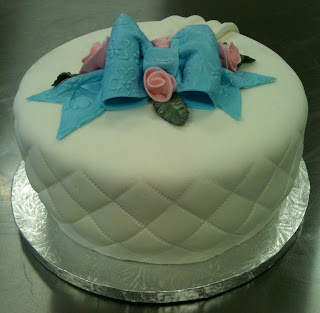
I did okay on the quilting job, but I was feeling rushed and a bit flustered at this point, so there are places where I messed up. To add insult to injury, I somehow managed to stick my thumb in the side while I was working with it. I already embossed the sides, and the fondant had started to dry enough so that I couldn't smooth it out.


I'm happy with the bow, but I hate that the left ribbon tail is so much longer than the right. I didn't even notice that until I got it home and tool pictures. I also wish I'd done a better job of centering it. The green I used on the leaves isn't ideal for the blue and pink, but it's the only green luster dust I have. It looks much better with ivory roses, trust me. The fabric swag is okay, but I wish it was positioned better. We were really just learning how to make them, and at that point I just stuck it on the cake without really thinking about the bow, roses, and where it all should go.


So, taking the above into consideration, and understanding that there's always room for improvement, here are my thoughts on what I should've done to make this cake better:
  • Had the cake already iced before leaving the house. This is probably the biggest thing, as it would have either eliminated or alleviated some of the other issues and given me more time to cover my cake in fondant.
  • Trimmed the cake tops so the layers were completely flat against each other when I stacked them. That would have prevented the spare tire. Oh, and I should've remembered to push the layers together so the filling would settle.
  • Not messed with the dang cake circle underneath. That was a useless waste of cardboard. There's no reason I couldn't have this cake sitting directly on the silver cake base.
  • Been more patient when doing my quilting on the sides and more careful when imprinting the pattern.
  • Paid more attention to the bow tails' lengths and made them at least a little more even.
  • Borrowed a more suitable color of green luster dust for the leaves.
  • Planned out where I was going to place everything better and centered the bow.
  • Bought the floral imprint mat I used to make the bow. I seriously love it, and it wasn't that expensive. Now I really wish I had it.
  • I'll concede: I should've taken the time to put at least a bead border around the bottom before taking a picture and posting it on my blog.
At the end of the day, it's still a decent-looking cake. I'm not trying to be overly critical and nit-picky, but that's my work, and I consider myself a professional, so I need to have high standards. It's all in the interest of promoting excellence in cake decorating, you see. So with that in mind, what else could I have done differently to make this cake better?