Showing posts with label cake decorating. Show all posts

Sunday, April 22, 2012

I Love Free Stuff

Being a Wilton Method Instructor definitely has its perks. One thing I always look forward to every year is the Annual Instructor Meeting (AIM) because not only do we have a good time and learn from demonstrations, but we always go home with a nice collection of free Wilton gear, usually items recently added to the product line.

This year they released a lot of new cake decorating tools, and they've revamped and improved some of their existing products. Here's all I brought back, minus a tub of 101 cookie cutters that just wouldn't fit right in the picture and a pack of butterfly stickers I totally forgot about. "Wilton Brands" also includes some scrapbooking and craft supply companies, and the stickers are from EK Success.
At some point I'll completely unpack everything and show more of the actual tools themselves, but that might be better done as a video, and I have the Sugar Play Day to get ready for in a few hours, so this is all I have time to post for now.

At the end of the meeting, the leftover display products were randomly given out to instructors via a drawing, and I got one of the new tip organizers. There are many reasons why this one is better than the old tip storage boxes, but the main thing is the top locks on really tightly, and the lid doubles as an angled base so you can more easily see your tips. Oh, and the little caddy up top is for storing large piping tips. This was a win.
I also got some butterfly sprinkles and stamens. Not the pearl stamens I was looking for, but lily stamens, which I can most definitely use. They gave us a new cake leveler, too. This one is much better. It's easier to adjust the wire, and it's more sturdy.
Wilton updated their icing bag holder, and in addition to having better sized holes, this new one isn't flimsy like the old ones. A totally new product is the Decorating Bag Sleeve. You get three in a box, and these remind me of the things you cook Hot Pockets in. They hold the bag upright so you can fill it with icing, and then afterwards, once the bags are all washed and clean, they prop them open so they can air dry.
The new fondant tools we received are pretty much improved versions of what we already have. There's a redesigned fondant smoother, and I'm really excited about the easier to use ribbon cutter and amped up embosser wheel.
Both of these tools come with handy storage boxes, which is a definite plus. Inside the boxes are little pegs to keep the bits and pieces organized and easy to find.
Oh, and here is the display piece I made, representing all of the Wilton 4-week courses. They were having a drawing for one of those new Ultimate Rolling Tool Caddy things, and if you brought in a display you were entered in the drawing to win it. Sadly, I didn't win. Something like this would really be useful, but I may wait and see if they put locking casters on the wheels before I get one.


Thursday, April 19, 2012

Minecraft Diamond Ore Cake

Minecraft is very popular at our house, and for my older son's recent birthday we made a diamond ore cake. In case you don't know what they look like, or can't be bothered to follow the link to Minecraft Wiki, here's what we were going for:

When it comes to projects like this, I like to see if I can find somebody else who has managed to make something similar, so I can pretty much just do whatever they did since it seemed to work out for them. Like I needed another excuse to browse around Pinterest, right? While I didn't find a diamond ore cake, I discovered a couple of different dirt block cakes: one is exceptionally well done with thousands of little rolled fondant squares, and the other is more simple, made by YouTuber MincraftChick. I also found these Minecraft Cake cupcakes, which I think are lovely.


Making a cake that's a cube shape was easy enough, we just used three 8-inch square cake layers. Since they're between 2 and 3 inches tall each, stacked up they looked enough like a cube. We decided to add an extra level of fun and color the cake layers themselves gray with blue flecks, so that when you cut into the cake, it looked like diamond ore, not cake. This didn't work out so well, as the blue sprinkles I planned to use (like funfetti) dissolved in the cake batter and turned it an awful blueish gray.

I used Duncan Hines Classic White cake mix and added around 4-5 drops of Super Black food coloring to make the layers gray. We then sandwiched them together with gray-tinted buttercream and a generous layer of the blue sprinkles.

We were going for a marbled gray rolled fondant to cover the cake with, but by the time I got it rolled out large enough, the color was pretty thoroughly mixed in. We tried embossing the square pattern on the top and sides of the cube, and that looked okay, but we ultimately opted to add rolled fondant squares in gray and various shades of blue all over the cake. I'm pleased with the results.
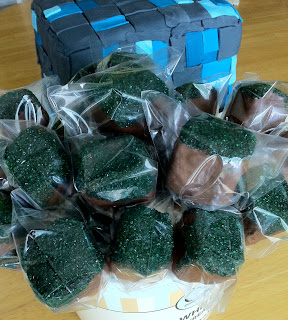
To go along with the diamond ore cake we made dirt block treat pops. These are like cake pops, only made with rice cereal treats instead of cake. They're much easier and quicker to make, as they don't require multiple steps of chilling, and it's a firmer mixture to shape. These we dipped in chocolate bark coating and then dipped the tops in green sanding sugar.
We also constructed a pickaxe out of the rice cereal treat mixture and covered it with chocolate bark coating on the handle and white candy melts on the blade part.
Sadly, I neglected to get any pictures of the cake after it was cut so you could see all the gray goodness inside. One of the layers turned out just a shade or two darker than the others, as is typical. It's so hard to match colors exactly when you try to remix them.

Thursday, April 12, 2012

Wired Gum Paste Rose Leaves and Bouquet

The point of having gum paste roses (or any flower, for that matter) on wires is so that you can make an arrangement by taping them together with floral tape. Otherwise, you can just make them on toothpicks or pieces of uncooked, thick spaghetti. This means if you want to have any leaves in your bouquet, then they also need to be on wires. I show you how to do it in a tutorial I posted on CakesDecor.com, complete with pictures and instructions.

I posted several tutorials on that website because they were having a contest, you see. And these are all things I've been wanting to post here on my blog, but my efforts get more traffic and exposure over there. Plus, I think it's a pretty cool place for cake decorators to hang out, and there are many more tutorials posted that cover a wide range of cake decorating skills and techniques.

Once your leaves and flowers are all made, you can have a lot of fun and get really creative with petal and luster dusts to add some color and shimmer to really make your flowers look impressive. Then, you just attach them together with floral tape. I can be am very clumsy, and these petals and leaves are fragile, so I like to work over a kitchen towel. I still break stuff, which is why it's always a good idea to make extras, but at least if anything slips from my fingers it will land on a somewhat soft surface instead of shattering as soon as it hits the table.

Below is the full playlist showing how to make wired roses and leaves, as well as how to paint them with luster dust and tape them together in an arrangement. I have more cake decorating videos posted on my YouTube channel, including a few on how to pipe flowers using petal tips and a flower nail.


Sunday, March 25, 2012

Spring Break Cake Decorating Camp

I'm offering the "Enjoy Cake Decorating" classes in a three-day camp series during Williamson County's Spring Break at the Longview Rec Center in Spring Hill. Students can register for just one class, two classes, or all three, depending on their interest. These classes are geared for ages 8 and up, and each class is $15 with a $10 supply fee.

Monday April 2, 1:00-4:00 Buttercream Basics: The ideal class for anyone new to cake decorating. Students learn how to level, torte, fill, and ice cakes smooth, as well as simple piping techniques like stars and shells. Students don't need to bring anything to Buttercream Basics, as all supplies are provided, including the cake layers.

Tuesday April 3, 1:00-4:00 Introduction to Rolled Fondant: This class is for those with little to no experience working with rolled fondant icing. Students learn how to handle, tint, and shape fondant as well as how to cover a cake and add simple fondant decorations to it. Students need to bring in a cake that has been "crumb coated" with a light layer of icing--it does not need to look pretty because the icing is just there to make the rolled fondant stick to the cake. If they have a rolling pin and pizza cutter to bring, that's great, but if not I have extras they can use.

Wednesday April 4, 1:00-4:00 More Fun With Rolled Fondant: For for those who enjoyed Introduction to Rolled Fondant or already have some experience working with rolled fondant and want to learn more. This class covers how to make bows, ribbons, swags, and simple leaves and flowers. Students need to bring in a cake that is iced (with the icing of their choice) and ready to decorate. They also need a rolling pin, and pizza cutter if they have them, if not I have spare tools for the students to use during class.


Monday, March 19, 2012

Spring Day of Sharing

Yesterday was the Tennessee ICES chapter Day of Sharing. I went to one of these things years ago while I was still working in a bakery. Then motherhood happened, and I let my ICES membership lapse. When I started teaching more cake decorating classes I rejoined ICES, and since I don't teach Wilton classes on Sunday afternoons anymore, now I'm free to attend these types of functions. Susan Carberry was there to demonstrate some advanced cake decorating skills, and she actually taught several classes leading up to the Day of Sharing, but sadly none of them worked with my schedule.

However, I got to see the cake from her Garden Critters class, as it was on display. Pretty cool!

For the demonstration on Sunday, she built this Easter-themed stacked chick cake, and to go along with it she made a rabbit in a motorized carrot car.
To construct a cake like this, you need to get supplies and materials from the hardware and/or pet supply store. The stand is made from PVC pipes. That's how the whole thing is supported. Water squirts out of the bottom chick's mouth, and to make that happen she used a fish tank pump and plastic tubing. The top chick rocks back and forth, and it was built on the insides of a kid's toy.
The bunny is modeled from rolled fondant, and his car is a large carrot shape made from rice cereal treats on top of what was once a remote-controlled jeep toy. And no, none of that is real cake. She used styrofoam (much of it she had to hand carve to get the right shape) to make anything that isn't rice krispies treats. But you could conceivably make this with real cake, if you're up for a project.

So if you're not already a member, join ICES and participate in events organized by your local chapter because there's always more to learn.


Friday, March 9, 2012

Luau Tiki Men Cupcakes

Every year about this time the Scholastic Book Fair comes to my kid's school. For an entire week, the library turns into a book store, all decked out according to the theme. This year it's a Luau.

I'm happy to support the book fair because it benefits the school and encourages kids to read. I've even picked up some choice finds in years past. That's where I acquired Hello, Cupcake! and What's New Cupcake? but I was really excited to see Bakerella's Cake Pops book on the shelf this year.

I volunteered to bring sweet treats, and since I've been telling everybody to buy Bakerella's book I probably should've made cake pops. I thought about trying to make little tiki men shaped cake pops, but I wasn't convinced it would work, and cake pops take a lot of time.

So I decided to make mini cupcakes. You can usually get at least 72 out of a box of cake mix, so they're great for feeding a crowd. I used a box of Duncan Hines Confetti cake mix and got 78 micro cakes. I only have one mini-muffin pan, so I had to bake the batter in batches, but that gave me time in between to work on the decorations.

Not really sure how to decorate them, and totally lacking imagination, I went with the design printed on the book fair flyers. Here's what I was going for. Or, at least something similar.
To make the tiki men, I formed chocolate fondant into a log shape, and then rolled it into a snake. I then cut it into (roughly) 3/4" segments. It's best to work on them one at a time, and you'll need to keep the spares covered so they don't dry out before you get to them. Using modeling tools, my assistant and I made tiki faces in each segment and left them to dry. We used a dog bone tool (small end) to make the eye indentations, a pointed modeling stick for the eyes, the thin end of a veining tool to make the nose, and a small spatula to make the forehead marks and mouths. But really, you could do all that with the tip of your pinky, a toothpick, and a pointy spatula. I also posted a tutorial demonstrating how to make these on CakesDecor.com
I also made small green leaves and blossoms out of a gum paste and pre-colored rolled fondant blend using plunger cutters. The blossom centers are sugar pearls, and I used an angled offset spatula to make small vein marks on the leaves. These can be made days in advance.
To assemble, I piped white buttercream on the top of each cupcake, using a tip #12 on some and a tip #21 on the others. Immediately after, I dipped the cupcake edges in brown sugar to look like sand. Again, it's best to work with them one at a time so the icing doesn't crust before you get the cupcake edges dipped in the brown sugar. Also, sometimes brown sugar is sticky and likes to clump up, depending on the humidity. If that's an issue, mix in some regular sugar to help break it up. Then, I positioned a tiki, some blossoms, and a couple of leaves on the top.
I figured out, quite by accident when I got a glob of buttercream on a tiki and then wiped it away, that you can highlight the features and details by smearing a little icing across it. This white buttercream makes a nice contrast on the chocolate fondant. But, I didn't really have the time to do them all that way, so I left the rest plain.
Since these are mini cupcakes, they might be a bit top heavy, especially the ones that get a little more full because their tops are bigger. Also, some of the tiki men wanted to lean, so the blossoms and leaves help prop them up.
The thing about making the tiki guys by hand is that they all come out looking a little bit different, and they were so much fun to make! I have more pictures, possibly with an obscure reference or two, posted on photobucket.

Pin It

Saturday, March 3, 2012

Gum Paste Carnations--Not on Wires

Since I posted a a tutorial on how to make gum paste carnations on floral wires, which is how I originally learned to make them, I thought I might as well also post one on making wireless gum paste carnations.

This is similar to how they're made in Wilton Course 3, only I prefer to use a scalloped cutter as opposed to a plain round cutter, and I use a different frilling method. As with the wired carnations, you need to make the bases first and wait until they're completely dry before adding the petals. I think it's easier to add the calyx before building the flower because the carnation petals are fragile, and I always break a few petal edges when I put the calyx on last.

Anyway, here's the link: Gum Paste Carnations (not on wires), and while you're on the CakesDecor.com website, check out some of the other tutorials. There have been quite a few fun ones added.


Pin It

Sunday, February 26, 2012

Wired Gum Paste Roses

In addition to posting a tutorial on how to make wired gum paste carnations, I also did one on making wired gum paste roses. You can see the whole thing on CakesDecor.com. Below I have the relevant videos embedded, as well as photo slideshows.


Pin It