Showing posts with label wilton. Show all posts

Sunday, April 22, 2012

I Love Free Stuff

Being a Wilton Method Instructor definitely has its perks. One thing I always look forward to every year is the Annual Instructor Meeting (AIM) because not only do we have a good time and learn from demonstrations, but we always go home with a nice collection of free Wilton gear, usually items recently added to the product line.

This year they released a lot of new cake decorating tools, and they've revamped and improved some of their existing products. Here's all I brought back, minus a tub of 101 cookie cutters that just wouldn't fit right in the picture and a pack of butterfly stickers I totally forgot about. "Wilton Brands" also includes some scrapbooking and craft supply companies, and the stickers are from EK Success.
At some point I'll completely unpack everything and show more of the actual tools themselves, but that might be better done as a video, and I have the Sugar Play Day to get ready for in a few hours, so this is all I have time to post for now.

At the end of the meeting, the leftover display products were randomly given out to instructors via a drawing, and I got one of the new tip organizers. There are many reasons why this one is better than the old tip storage boxes, but the main thing is the top locks on really tightly, and the lid doubles as an angled base so you can more easily see your tips. Oh, and the little caddy up top is for storing large piping tips. This was a win.
I also got some butterfly sprinkles and stamens. Not the pearl stamens I was looking for, but lily stamens, which I can most definitely use. They gave us a new cake leveler, too. This one is much better. It's easier to adjust the wire, and it's more sturdy.
Wilton updated their icing bag holder, and in addition to having better sized holes, this new one isn't flimsy like the old ones. A totally new product is the Decorating Bag Sleeve. You get three in a box, and these remind me of the things you cook Hot Pockets in. They hold the bag upright so you can fill it with icing, and then afterwards, once the bags are all washed and clean, they prop them open so they can air dry.
The new fondant tools we received are pretty much improved versions of what we already have. There's a redesigned fondant smoother, and I'm really excited about the easier to use ribbon cutter and amped up embosser wheel.
Both of these tools come with handy storage boxes, which is a definite plus. Inside the boxes are little pegs to keep the bits and pieces organized and easy to find.
Oh, and here is the display piece I made, representing all of the Wilton 4-week courses. They were having a drawing for one of those new Ultimate Rolling Tool Caddy things, and if you brought in a display you were entered in the drawing to win it. Sadly, I didn't win. Something like this would really be useful, but I may wait and see if they put locking casters on the wheels before I get one.


Saturday, November 19, 2011

Those New Wilton Punches

Earlier this year, Wilton released a new product line called Punch.Cut.Decorate! that consists of punch cutters like the die cutters used in scrapbooking. The companion product, Sugar Sheets, are very thin, edible "paper" you cut with the punches, available in a variety of colors and patterns.
There are two basic punches: an oval and wavy line. But you can then get different inserts that cut other shapes. You may have seen the swanky new product display in the Wilton aisle of your favorite craft store. I mention it because I think these type of decorating tools might appeal to crafters who have previously been intimidated by cake decorating, as this is really more like scrapbooking and paper crafts. You're just using edible sugar paper and food-safe punches.
The potential for creativity here is huge, and I can see how these products will open up the world of cake decorating for a whole new market. At least, I suppose that's what Wilton hopes will happen. Instructors got a sneak preview of the product line at our annual meetings, and we got to take a set of the basic punches home with us along with a sample pack of Sugar Sheets, which was awesome!
We were supposed to showcase the new products in our Wilton classes for a period of time, so I got some practice using the punches with Sugar Sheets. I didn't have much luck with the Sugar Sheets. I had a hard time getting them to cut cleanly, and after a while--even though I kept them sealed up--they started to dry out. When Sugar Sheets get dry, you can't fold the shapes you cut or they'll crack.

While I think the vast majority of instructors are very excited about these new punches, I lack enthusiasm. I try to be open minded, and I normally love learning new tricks and techniques, but this method doesn't really appeal to me. Maybe I'm too old school. Cake decorating to me involves squeezing icing out of a piping bag, texturing rolled fondant, or making gum paste flowers.

Plus, have you seen the price of the Sugar Sheets?! And you know, the punches aren't free. I'm not able to invest in a whole new round of equipment, and besides, I don't have the storage space. Now that I'm out of Sugar Sheets, I was hopeful that the punches would work with wafer paper, as that's much more affordable. But they don't.
So, I tried them with some rolled fondant, and they did fairly well. I think using gum paste or at least a half-fondant/half gum paste mix might work better. The fondant was a bit too soft and stretching was an issue, but not a huge problem.
Here's a close up of the roses and wee crown I made using shapes from the wavy cutter. The oval cutter made the bow loops and rather-too-large-to-be-whimsical butterfly. Or whatever you think it looks like.

I feel as though I'm still in the process of getting used to these tools, and I'm not quite as comfortable with them as I'd like to be. However, even though they're not be my favorite tools to work with, some of my students love them and have had a lot of fun getting creative with the shapes.

Monday, August 15, 2011

Housekeeping, Videos, and Back to School

I honestly meant to post a "Should've Done Sunday" yesterday, but I found myself vacuuming the house instead. There was also a bit of laundry that needed doing, and some other random chores that I couldn't put off any longer. But at least the weather was gorgeous, and it was slightly cooler less sweltering yesterday with a nice breeze, so I even managed to open a window or two and let the house air out a bit. I'm ready for autumn.

I also added three new videos over the weekend. Have you noticed the recently added "Videos" page? The link is up top there under the header. These are short clips demonstrating basic cake decorating techniques. Not long ago, I upgraded my iPhone, and that's what I've been using to film these videos. Hopefully they will improve over time as I get more adept at the filming and editing process. Please let me know what you think, and I'm totally open to suggestions for future videos, so tell me what you'd like to learn how to do. They are also posted on my YouTube channel, if for some reason they aren't working here.

I need recipe ideas for future blog posts. Now that school has started, I like to think I'll have more time in the kitchen. Delusional, I know. But still, I'm open to suggestions for after school snacks and other kid-friendly goodies that I can try to recreate in a healthier and/or gluten free redux.

Oh, and since the kids are back to school, perhaps now would be a good time to explore a new interest or spend more time pursuing an existing hobby, such as cake decorating. I have my "Enjoy Cake Decorating" classes scheduled on Thursday and Saturday mornings at the Rec Center, and the following Wilton classes at Hobby Lobby in September: Gum Paste and Fondant on Thursday evenings and Decorating Basics on Saturday afternoons. The cool thing about the Hobby Lobby classes is that students who take a Wilton class at Hobby Lobby in September will receive a $10 "Thank You" coupon from Wilton, which includes a $7 shipping allowance. That's a great deal because normally Wilton shipping charges are extortionate. Plus, this means you can pick an item from the Yearbook for $10 or less and it's free. More information on the above classes is posted on my Upcoming Class Schedule page.

One last thing... there's only one more day left to enter the UPrinting poster giveaway. The prize is a custom 18"x24" poster. Entries are still low, so you have a good chance of winning!

Thursday, May 5, 2011

Summer is Almost Here!

This post is mainly for the locals, as it pertains to my cake decorating class schedule and some camps I'll be offering in June. Nothing like a little shameless self-promotion on a Thursday, right?

As you may know, I recently started teaching Wilton classes at the Hobby Lobby in Franklin. Right now, those classes meet on Saturday afternoons, and I'm working towards adding an evening class option at that location. I will update my Upcoming Class Schedule page once that's all finalized and official.

I still teach Wilton classes at the Brentwood/Cool Springs Michaels store. At the moment I only have classes scheduled there for Sunday afternoons, but there's another Wilton Instructor at that store who teaches night classes. I'm happy to offer weekday classes at that location if there's enough interest.

The really exciting news is that next month I'm teaching two different cake decorating camps at the Rec Center. These are for ages 12 and up and will meet on Monday, Wednesday, and Friday afternoons from 1:00 - 4:00.

  • Essential Skills Camp meets on June 13, 15, and 17. We will focus on cake decorating basics and working with buttercream icing. Students also learn how to use color flow and royal icing, in addition to more advanced piping techniques.
  • Rolled Fondant Camp meets on June 20,  22,  and 24, and it covers all the basics of working with rolled fondant. This fun and versatile icing is the perfect medium for expressing creativity. Students will learn how to cover and decorate a cake with rolled fondant, as well as how to make simple, hand-molded decorations and flowers. We'll also use a variety of tools to create stunning effects and realistic flowers.
Please feel free to contact me with any questions you may have about the classes or camps. Also, if there is something you're interested in learning how to do, but it isn't listed, let me know.

Wednesday, March 30, 2011

Wilton Cake Decorating Classes at Hobby Lobby

Starting in April, I'll be teaching Wilton Cake Decorating Classes on Saturday afternoons from 2:00 - 4:00 at the Hobby Lobby off of Highway 96 in Franklin.

As is turns out, April is a great month to take Wilton classes at ANY Hobby Lobby, not just the one where I'm teaching, because the tuition for all three 4-week courses is only $20! But wait, there's more...
In addition to the fantastic price on tuition, anybody who takes a 4-week Wilton course (Decorating Basics, Flowers and Cake Design, or Gum Paste and Fondant) will receive a $10 "Thank You" coupon from Wilton. This coupon is good for $10 off your total Wilton mail-in order. PLUS, they're giving you $7 in free shipping, so that's a total value of $17!

Decorating Basics starts at the Franklin Hobby Lobby on April 9th. See my Upcoming Class Schedule page for more details, or stop by the store to register.

Sunday, February 13, 2011

Should've Done Sunday: Wilton Wedding

Many years ago, before becoming a Wilton Instructor myself, I was a Wilton student for a few months. This was in 1998, when it was just courses 1, 2, and 3, before they really did much with rolled fondant and long before they added the Fondant and Gum Paste course, which has been relaunched as Gum Paste and Fondant as of last summer. Back then, in Course 3 we dabbled a little in rolled fondant by making a clown face cake using brightly-colored fondant cut-out shapes, but I don't have a picture of it, and it wasn't all that great anyway. We also made a fondant heart cake topper during the second class to use on our final cake, which was a two-tier separated by push-in pillars.
Apologies for the shoddy cropping. I had this photo in my scrapbook and tried to cut out as much of the background as possible. There's really not a LOT wrong with this cake, because I copied it from the back of the student lesson plan, which is evidence of my lack of creativity and imagination, but also was the easy answer since I was working full-time and really couldn't be bothered to come up with anything original.

Anyway, there is a lot going on with this cake, and most of the techniques are no longer taught in the Wilton four-week courses. This is mostly because they're outdated and nobody wants ruffle borders on their wedding cakes now. Thanks to the popularity of rolled fondant and brides preferring more modern designs, string and frills got dropped so that there would be time to teach the latest techniques (that Wilton incidentally had cool new tools for), but still it's a shame.

The hearts on the bottom tier and all the little blue flowers (I think they're forget-me-nots, but I can't remember) were piped with royal icing. The topper is made from two hearts cut from rolled fondant, and in the student kit we got that dinky plastic dove. There were also some plastic beads that we were supposed to attach around the heart, but I piped a bead border with royal icing instead.

The bottom tier also has shell borders and string work, and overall I'm pretty happy with it. The top tier is a six-inch round chocolate cake--which is obvious thanks to the crumbs, grr!--with a shell border around the top and shells with ruffles along the bottom. There were also strings on the sides of this cake, in between the drop beads, but for some reason they didn't stick very well. When I got it back home, half of them had fallen off, so I just took away the rest rather than pipe more. I'm lazy that way.

This was the first tiered cake I ever made, and for the most part it's not too bad. Still, there are a few things that, in hindsight and with the eyes of experience, I should've done. You can probably figure them out, and if you see anything I've missed, feel free to mention it in a comment.

  • I can't remember, but I think I used one box of cake mix for each tier. That's why the top cake is so much taller than the bottom. Ideally, unless you're doing something whimsical, tiers should be uniform in height. I should've either trimmed the layers of the top tier down, or used a box of cake mix for each ten-inch round layer. Thanks to the camera angle, this isn't a terribly obvious flaw, but I know it was there.
  • I should'n't have used chocolate cake on that top tier. See the crumbs showing through? Yeah, chocolate cake is a nightmare to ice with white icing. Unless it's frozen solid, and even then it's a pain. What was I thinking?
  • I really hate the topper. I wasn't crazy about it back then, but I can't stand it now. It looks cheap and cheesy. I should've done something else. Exactly what, I don't know. Any thoughts?
  • I shouldn't have cropped this photo. At least, not like that. 
Okay, so there you have this week's should've done Sunday. Feel free to chime in with anything else I may have missed.

Wednesday, December 22, 2010

Gingerbread

Every year we decorate gingerbread. I let my kids pick out whichever pre-baked kit they want, because I tried doing the whole thing from scratch one year and swore I'd never do it again. You need a degree in engineering or architecture or something. Besides, since the kits include EVERYTHING you need and are only around $10 each, there's no way you could buy all the ingredients and other supplies for less than that. Sometimes we wait until Christmas Eve to do them, but this year we got an early start. In the past, we've had a house and a tree, but this year the store only had house kits left.
The gingerbread house pieces come shrink-wrapped to a board and enclosed in bubble wrap so they stay intact. You can use this board as the base to assemble your house. There is also slightly bigger cardboard inside the box, and I prefer to use that. I like to wrap it in freezer paper so it's white, and since the surface it slick, it's also easy to keep clean. The house consists of a front and back (the peaked walls), 2 short side walls, and 2 larger roof pieces.
  
The powered icing mix is super easy; all you do is add water. It's very similar to royal icing, only it tastes better and still dries very hard. Please be careful not to add too much water. The instructions say to use 5 tablespoons of warm water, and you may need to add more, especially if young hands are having to squeeze it out of a piping bag, but only add a little at a time. The icing won't be fluffy like buttercream, and it dries out very quickly, so keep it covered with a damp paper towel when not in use. That includes icing in a piping bag! You don't want it to dry in there and clog your tip.
  
You'll need to assemble the house and allow the icing to dry completely before decorating it. I find it easiest to pipe the icing along the gingerbread edges--sides and bottom--and then hold them in place until the icing starts to dry and they can stand up on their own.
  
 Once one peaked and one side wall are secure, you can add the others.
 
I like to add extra icing to the inside corners and bottom edges for reinforcement. I then take a spatula and tidy up the exterior seams and bottom edges by scraping off any excess icing that may have oozed out.
 
Once the walls are put together, it's a good idea to leave them for an hour or so before adding the roof. This makes sure the icing is dry and the whole thing is stable before adding weight to the top. When the icing holding the roof in place it totally dry, it's time to decorate!
  
This year, I bought some candy molds to make accessories for the houses like a welcome mat, windows, shutters, a door, landscaping, fence pieces, and chimney. I'm a sucker for cool candy molds, and candy melts are so easy to use, and available pre-colored. Of course, they're not "proper" chocolate, but you don't have to worry about tempering. Just melt and mold.
There are several different ways you can make candy using molds. I like to put the melts in a plastic disposable piping bag then zap the whole thing in the microwave until melted. I do intervals of 20 seconds, kneading the bag in between to help them melt evenly.
 
Then I snip off the bottom and squeeze the melted candy into the mold. To make multi-colored pieces, layer the candy by doing the front colors first, allow that to set, then add in any additional colors. Alternatively, if the accents are really small, you can use a small (food-safe) paint brush to apply the melted candy to the mold.
The candy pieces will set up faster if you let them chill in the refrigerator, and then they'll just pop right out of the molds. You can then attach them to the gingerbread with icing or melted candy.
 
For the chimney, I found it easier to use melted candy to assemble the 4 sides of it first, then stick it on the roof.
 
Here are the finished gingerbread houses. Just so you know, all I really did was help with the assembly and mold the candy pieces. My kids did the rest.
 

Wednesday, December 15, 2010

Floral Fantasy Fondant Imprint Mat

Thank you so much to everyone for participating. I realize there were some late entries, but I'm going to go ahead and include them since I really didn't do a great job of promoting this contest until the last few days. The entries trickled in slowly at first, and I feared it was going to be a total flop, but this giveaway ended up being my mot successful one yet! Okay, the winner is...

Comment number 33, which is deanna. Congratulations! Again, thanks to everyone who entered. Don't worry, I have more giveaways planned, so please check back. I wish everyone a safe and happy New Year!

Okay guys, here is another giveaway courtesy of free Wilton swag that I either have duplicates of or have no real use for. This one is the former, in that I bought both the Floral Fantasy and Leaves and Vines fondant mats when they first came out. Then later, when I attended an Wilton Instructor meeting, we were all provided with one or the other. I was handed a Floral Fantasy, which I stashed away when I got home, much like the poor, neglected Care Bear pan.

This mat has been comfortably resting on top of my kitchen cabinets ever since, and as my fondant mats that are already in use show no signs of needing to be replaced any time soon, I'm offering up this one.

  
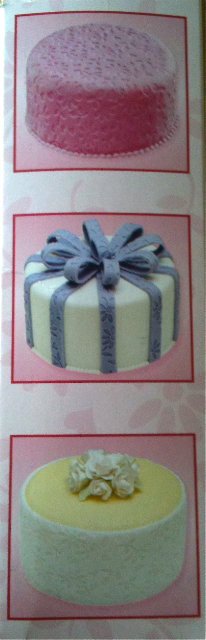
Fondant imprint mats are an easy way to emboss a design over a large area. This one has a lovely floral pattern. Instructions on how to use it are printed on the back of the box, and some pictures on the front and sides display a few ideas.

Here is a close-up look at the texture. This is the pattern that is imprinted on the fondant.


So here's how to enter if you would like a chance at winning this Floral Fantasy Fondant Imprint Mat: Leave a comment below telling me your favorite flower. If you don't have a favorite flower, then make something up. I require constant amusement, you see. This entry is mandatory and must be done or else the other entries won't count. Yeah, I know. I'm nosy.

There are 7 ways to rack up bonus entries, but please be sure to leave a separate comment on this blog post for each entry so it counts.
  • Follow Darla's Cake Blog via Google Friend Connect. 
  • Follow Darla's Cake Blog via Networked Blogs.
  • "Like" Darla's Cake Blog on Facebook. 
  • Leave a comment on the Facebook page for Darla's Cake Blog.
  • Follow @cakedarla on Twitter. 
  • Tweet or blog about this giveaway, and then leave a comment on this post with the tweet/blog entry URL. You can use any wording you like, just make sure to include a link to this blog post (shortened URL: http://bit.ly/hAjA73) and @cakedarla. You get one entry per tweet, but only one tweet entry per day, please. Example: #Win a Wilton Floral Fantasy fondant imprint mat in @cakedarla's latest #giveaway http://bit.ly/hAjA73 #cake #decorating #rolledfondant
  • Post a link to this giveaway on the social networking site of your choice (Facebook, CafeMom, etc.) and leave a comment on this post letting me know. 

And... GO! You have from now until December 30th at 11:59 p.m. to enter. One lucky winner will be chosen at random from all the entries on December 31st, 2010. If you're not on Twitter, Blogger, Facebook, or Google, please leave your email address in your comment so I can contact you. Good luck!

***Wilton has neither sponsored nor endorsed this giveaway.***