Showing posts with label easy. Show all posts

Wednesday, December 28, 2011

Hazelnut Truffle Squares

Another great recipe find on my epicurious app, that's also free from any gluten-containing ingredients, is the decadent sounding Chocolate Almond Truffle Squares. But there were a few obstacles in my way when it came to making it. Namely, I didn't have any Amaretto. So I decided to use Frangelico instead. Since I wasn't using almond liqueur, I figured it wouldn't be the worst thing in the world for me to use hazelnuts in lieu of the almonds. My body doesn't really tolerate a lot of dairy products these days, so I substituted coconut milk for the heavy cream. But hey, at least I stuck with one original ingredient: the chocolate.

Hazlenut Truffle Squares:
16 ounces bittersweet chocolate (I used 60%)
1/2 cup coconut milk (the thick, creamy part)
3 Tablespoons Frangelico
1/3 cup coarsely chopped hazelnuts (next time I'm going with the skinless)

The first thing you need to do is refrigerate a can of coconut milk overnight or longer. This causes it to separate, and the thick cream will rise to the top. Then, you just have to scoop it out.
In a saucepan, heat the coconut milk just to the boiling point, and then whisk in the chocolate, stirring until it's all melted. Add in the Frangelico, whisk until smooth, and allow to cool.
Line the bottom of an 8-inch baking pan with wax paper. Melt the remaining chocolate and spread half in a thin layer over the wax paper.
Place the baking dish in the freezer for 5 minutes to set the bottom chocolate layer
Spread the truffle mixture evenly, then pour the rest of the melted chocolate on top, spreading lightly. 
Sprinkle with the chopped hazelnuts. I opted to toast mine first.
Let the whole thing chill for at least three hours. I turned mine out onto a chopping board, removed the wax paper, and cut into small squares.
Overall, I'm really happy with how these came out. They're very rich and have a delicious flavor, but I have to say that they're just a tad bit too boozy for my liking. I should have anticipated this and used less Frangelico. I'll know for next time, but at least I'm not tempted to gorge myself on them. Oh, and a wee tip: make sure the truffles are good and cold. Some of mine didn't want to cut cleanly.

Monday, December 5, 2011

Gluten Free Cinnamon Rolls

Back in February I made rolls using Pamela's Gluten-Free Bread Mix. I was pretty happy with how they turned out, and I decided next time I had a bag of this stuff to make the cinnamon bread variation listed on the back. Only, baking a loaf of this bread means over an hour of cooking time in the oven, and then of course you have to wait for it to cool before slicing it. Plus, there's also the added work of slicing it. I'm lazy, and I didn't really want to make a whole day of it, so I decided to make cinnamon rolls instead.
These were done just like the regular rolls I made, only I folded in some cinnamon, sugar, and a little nutmeg before putting the batter/dough into the muffin pan cavities.

So, to start with, I followed the directions for oven baking. You can also use this mix in a bread machine, but I don't have one so I have no clue how it turns out when you make it that way. Just measure 1/4 cup oil (I had canola on hand, if anyone is wondering) into a 2 cup measuring container, add 2 eggs, and then fill to the 2 cup mark with warm water.
To make cinnamon bread, mix together 2 teaspoons cinnamon with 1/4 cup of sugar. I also threw in some freshly grated nutmeg because I love it.
Place the bread mix and yeast, which is included the bag and sealed up in a little packet, in your mixer bowl and stir to evenly distribute the yeast in with the flour. Next, add the eggs, water, and oil mixture and beat with the whisk attachment for 3 minutes on medium high. The mixture will look more like a thick cake batter than bread dough.
Then, gently fold in the cinnamon and sugar mixture a few times to make swirls.
The last time I made rolls from Pamela's Gluten-Free Bread Mix, their messy appearance bothered me, so this time I tried to smooth the top of the dough after filling the cavities half full. But because it's so sticky, I didn't have much luck with that method.
So then I had the bright idea to pipe the batter into the pans, and that's what I did with the last 6 rolls. It even gives them more of a cinnamon roll appearance. Sort of.
These need to bake for about 25-30 minutes in a 350 degree oven, until the tops are a lovely golden brown.
Let the rolls cool in the pans for a few minutes before removing them. I sprayed the pans with nonstick cooking spray, and in a few places I guess I didn't do such a great job because a couple of the rolls stuck in the pan. But luckily, running a knife around the edges loosened them without tearing them up.
Allow them to cool completely on a wire rack, although they're quite yummy when they're still a wee bit warm. They don't taste like the cinnamon rolls that are made with sweet dough, and the cinnamon doesn't really come through very much. I can taste and smell it, and I know it's definitely in there, but I do wish these rolls had a stronger cinnamon flavor.
Cinnamon can be tricky, though. If there's not enough, you end up disappointed in the lack of flavor. But adding too much turns whatever your're trying to make into atomic fire balls. Plus, I don't know if me adding in the nutmeg may have altered the strength of the cinnamon somehow. 
I suppose that's enough of an excuse to make these again without the added nutmeg and see if that makes a difference. The texture is very bread-like, if a bit dense and heavy, and they're not too crusty, so all in all I think they're a success. But there's always room for improvement. I'd like to know your thoughts. When I make these again, should I try adding just a teaspoon more cinnamon? How would you make them?

Wednesday, March 23, 2011

Southern Women's Show and Tickets Giveaway

Entries are now closed, and the winners have been selected (thanks to Random.org) and contacted via email. If you're a lucky winner, please reply to the notification email within 48 hours so I can get your tickets to you! Also, if your circumstances have changed and you can no longer attend the show, please let me know so I can pass the tickets along to somebody who can. Thank you to everybody for participating, and maybe I'll see you next week at the Nashville Southern Women's Show!

This one is mostly for the locals or those who live within reasonable traveling distance to Nashville.

The 25th annual Southern Women's Show is coming to the Nashville Convention Center April 14-17 this year. That's right, this will be the 25th anniversary of the Nashville show! To celebrate, the first 25 visitors each day will receive a prize. Also, anyone who is 25 years old (must prove it with a valid driver's license) will get in free, and they'll be giving away $25 in "show bucks" every hour. Pretty cool, huh?
But there's so much more... With over 500 exhibitor booths featuring all things of interest to women, including fashion, health, beauty, travel, boutiques, and other products and services, there truly will be something for everyone. Not to mention, several celebrity appearances are scheduled, including local cake decorator Jay Qualls who was a contestant on TLC's The Next Great Baker, as well as the winner of that competition Dana Herbert, who will be there on Sunday, April 17th. Radio host Dr. Josh Axe will also be there in addition to a beauty pageant winner or two and somebody else who will be giving make overs. Good stuff!

I'm personally looking forward to the events. Like the Firefighter fashion show, live cooking stage, and test driving a Chevy Camaro or perhaps even the new Volt (don't tell my dad though, he's an avid Chrysler man). I'm also hoping to meet Jay and may even get up the nerve to ask him for a job.
Okay, so now that I've talked it up, I'll get to the good part. Tickets are normally $10 each, but the awesome folks in charge of promoting the Nashville Southern Women's Show have graciously supplied me with TWENTY tickets to this year's event to give away! I'm giving the tickets away in groups of four, so you can attend all four days, go just one day and treat three friends, take your best friend to the show for two of the days, or however you want to use them.

So, who wants to go to the Nashville Southern Women's Show? Just leave a comment on this post letting me know you want to go, and you'll be entered to win one of the five sets of tickets. Please also leave your email address so I can contact you if you're the winner. This is the mandatory entry, by the way.

If you'd like to rack up some bonus entries, feel free to do any or all of the following, just be sure to leave a comment on this post for each entry so it counts.
This giveaway will end at 11:59 CDT on April 4th so I have enough time to get the tickets to the winners. FIVE winners will be chosen at random from all the comments using random.org. Please remember to leave your email address in your initial entry so I can contact you. Winners will have 48 hours to claim their tickets. Good luck!

Saturday, February 12, 2011

Yummy Treats Decorating Camp: Cupcakes

The kids are on "Winter Break" until Wednesday, and my genius child had a great idea: host a Yummy Treats Decorating mini-camp for him and his friends. One day for cupcakes, one day for cake pops, and another day for cookies. We're having to skip a day for other obligations, but today was the day for cupcakes.

I baked 2 dozen red velvet cupcakes and 2 dozen yellow cupcakes, thanks to Kroger having Duncan Hines cake mixon sale for $1 per box not too long ago. We used chocolate pudding and raspberry jam for fillings and CK Buttercream icing. I had some Roundabouts Cupcake Sleeves left over from the Art Sparks event, which just happened to be Valentine's Day themed, so we used up the rest of those. They'll get distributed to various friends and acquaintances over the next few days. The kids got very creative with the other cupcakes, and it was a lot of fun.
These were super easy to make. They were iced using a piping bag and tip 1M, then sprinkled with either red sanding sugar, nonpareils, or Nerds candy.
  
I then topped each one with either a red M&M's candy, a SweeTarts heart, little blossoms cut from red modeling chocolate, or a red rosebud rolled out of modeling chocolate.
 
Then I just wrapped a sleeve around the outside, and viola: they're cupcake Valentines!
  

Wednesday, February 9, 2011

Product Review: Pamela's Gluten-Free Bread Mix

He who fears indulgence misses out.

That's a banner slogan on the Pamela's Products website, and I quite like it. We all benefit from a little indulgence every once in a while, especially when you consider all the definitions of the word. I think it's right up there with "He who dares, wins!"
But I didn't buy Pamela's Gluten-Free Bread Mix because of a catchy banner ad. I actually bought it because it was on sale, and I had tried it once before and underbaked the loaf of bread I attempted to make with it. I could tell that it tasted great, but most of it was inedible, so I resolved to try it again at some point. This bag of mix had been sitting in my pantry for a while, and I was in the mood for some bread, plus I needed a blog post, so I decided to give it another go yesterday afternoon. This time with rolls instead of a loaf. They don't take as long to bake, and I seem to do better with rolls. Portion control is also much easier.

Pamela's Gluten-Free Bread Mix comes in a bag with a little packet of yeast. There are instructions on the back for both bread machine and oven baking. I had a bread machine many, many years ago and LOVED it, but nowadays I do all my baking in the oven. I made the basic recipe as printed on the bag.
There are also suggestions for ingredient add-ins to make different types of bread, and you can find even more ideas on the website. I've already decided to try the Cloverleaf Style Rolls next time.
 
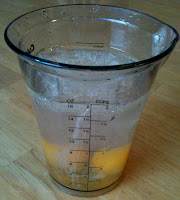
So, to make the basic recipe, all you do is put 1/4 cup oil and 2 eggs in a 2 cup measuring container, and add enough warm water (yeast likes warmth) to make 2 cups total. Add that to the bread mix and yeast, and mix with a whisk attachment for 3 minutes.
Since there's no gluten to help form the bread's structure, gluten-free doughs have to be mixed and handled differently than traditional bread, and often their dough is more like a soft batter, which was the case here. I filled greased muffin tin cavities about half-full with the dough, and let it rest for an hour. Well, actually, it was quite a bit longer than that because my oven got busy with cooking dinner, and then I kinda forgot about them, but everything came out fine.
The dough didn't really rise that I could tell from "resting" so I didn't take a photo of it before baking. I also neglected to get a picture of the finished rolls right when they came out of the oven, but here are some totally cooled and hanging out on a plate the following morning for breakfast. As you can see, the dough did rise while it was baking.
I know they're not all that pretty. I started to smooth the tops of a couple of them after I put the dough in the muffin tins, but I lost patience with that pretty quickly. The dough was really soft and sticky, so I thought that the tops would smooth out on their own during resting/baking. They obviously didn't, so lesson learned there.
 
Since those with gluten intolerance may have sensitivities to other foods, I'll list the ingredients. Pamela's Gluten Free Bread Mix contains: Sorghum Flour, Tapioca Flour, Sweet Rice Flour, Brown Rice Flour, Organic Natural Evaporated Cane Sugar, Chicory Root, White Rice Flour, Millet Flour, Honey and Molasses; Rice Bran, Sea Salt, Xanthan Gum, Yeast Packet.

The honey and molasses add a deep, sweet flavor, and I love the way it tastes. The texture is pretty good, too. In fact, nobody can tell these rolls are gluten-free just by looking at them, and most folks may not know even after eating one. The above photos show a roll cut with a knife, and here's what the inside looks like when pulled apart by hand.


Despite the outsides browning nicely, they aren't very crusty, and I noticed that the crumb goes a little stodgy in my mouth just before I'm ready to swallow, but overall the mouthfeel is pretty close to regular bread. Apparently you can also make bagels and pizza crust with this bread mix, which is fantastic. I just wish it wasn't so pricey. I was going to contact the company and see if they would send me some of their products to review, but they only send samples to groups, which is a bummer because I love getting stuff for free. Oh, well. This is one to watch for when it goes on sale.