Showing posts with label fun. Show all posts

Wednesday, March 23, 2011

Southern Women's Show and Tickets Giveaway

Entries are now closed, and the winners have been selected (thanks to Random.org) and contacted via email. If you're a lucky winner, please reply to the notification email within 48 hours so I can get your tickets to you! Also, if your circumstances have changed and you can no longer attend the show, please let me know so I can pass the tickets along to somebody who can. Thank you to everybody for participating, and maybe I'll see you next week at the Nashville Southern Women's Show!

This one is mostly for the locals or those who live within reasonable traveling distance to Nashville.

The 25th annual Southern Women's Show is coming to the Nashville Convention Center April 14-17 this year. That's right, this will be the 25th anniversary of the Nashville show! To celebrate, the first 25 visitors each day will receive a prize. Also, anyone who is 25 years old (must prove it with a valid driver's license) will get in free, and they'll be giving away $25 in "show bucks" every hour. Pretty cool, huh?
But there's so much more... With over 500 exhibitor booths featuring all things of interest to women, including fashion, health, beauty, travel, boutiques, and other products and services, there truly will be something for everyone. Not to mention, several celebrity appearances are scheduled, including local cake decorator Jay Qualls who was a contestant on TLC's The Next Great Baker, as well as the winner of that competition Dana Herbert, who will be there on Sunday, April 17th. Radio host Dr. Josh Axe will also be there in addition to a beauty pageant winner or two and somebody else who will be giving make overs. Good stuff!

I'm personally looking forward to the events. Like the Firefighter fashion show, live cooking stage, and test driving a Chevy Camaro or perhaps even the new Volt (don't tell my dad though, he's an avid Chrysler man). I'm also hoping to meet Jay and may even get up the nerve to ask him for a job.
Okay, so now that I've talked it up, I'll get to the good part. Tickets are normally $10 each, but the awesome folks in charge of promoting the Nashville Southern Women's Show have graciously supplied me with TWENTY tickets to this year's event to give away! I'm giving the tickets away in groups of four, so you can attend all four days, go just one day and treat three friends, take your best friend to the show for two of the days, or however you want to use them.

So, who wants to go to the Nashville Southern Women's Show? Just leave a comment on this post letting me know you want to go, and you'll be entered to win one of the five sets of tickets. Please also leave your email address so I can contact you if you're the winner. This is the mandatory entry, by the way.

If you'd like to rack up some bonus entries, feel free to do any or all of the following, just be sure to leave a comment on this post for each entry so it counts.
This giveaway will end at 11:59 CDT on April 4th so I have enough time to get the tickets to the winners. FIVE winners will be chosen at random from all the comments using random.org. Please remember to leave your email address in your initial entry so I can contact you. Winners will have 48 hours to claim their tickets. Good luck!

Saturday, February 12, 2011

Yummy Treats Decorating Camp: Cupcakes

The kids are on "Winter Break" until Wednesday, and my genius child had a great idea: host a Yummy Treats Decorating mini-camp for him and his friends. One day for cupcakes, one day for cake pops, and another day for cookies. We're having to skip a day for other obligations, but today was the day for cupcakes.

I baked 2 dozen red velvet cupcakes and 2 dozen yellow cupcakes, thanks to Kroger having Duncan Hines cake mixon sale for $1 per box not too long ago. We used chocolate pudding and raspberry jam for fillings and CK Buttercream icing. I had some Roundabouts Cupcake Sleeves left over from the Art Sparks event, which just happened to be Valentine's Day themed, so we used up the rest of those. They'll get distributed to various friends and acquaintances over the next few days. The kids got very creative with the other cupcakes, and it was a lot of fun.
These were super easy to make. They were iced using a piping bag and tip 1M, then sprinkled with either red sanding sugar, nonpareils, or Nerds candy.
  
I then topped each one with either a red M&M's candy, a SweeTarts heart, little blossoms cut from red modeling chocolate, or a red rosebud rolled out of modeling chocolate.
 
Then I just wrapped a sleeve around the outside, and viola: they're cupcake Valentines!
  

Monday, January 31, 2011

My Other Display Samples

I know I was supposed to post pictures of the other display samples I made for the Art Sparks event before now. The thing is, I procrastinate, and so I ran out of time and didn't even get two of the dummy cakes decorated--although they are iced. I had grand visions of setting up an awesome table to promote my cake decorating classes, snapping a few photos of it to impress everybody, and then posting all about it. That didn't happen. Despite arriving with a good 45 minutes to set up, I didn't have a chance to take a picture of my booth. Honestly. I was busy the entire five hours because everybody wanted to decorate a cookie or cupcake. Some folks opted to do both, which I suppose I shouldn't have allowed, but there ended up being plenty for everyone and I even had a few left over.
Apologies for the glare on this.
Technically, since my clases are for teens and adults, the cookies and cupcakes were for ages 12 and up to decorate. However, this was a family-friendly event, and while I did my best to encourage the moms and dads to decorate a treat for their kids, I wasn't able to stick to that policy very well. I also really wanted to take pictures of cookies and cupcakes the visitors to my station decorated, but I didn't have a spare moment. There were maybe three very brief lulls, but I had to use that time to quickly reorganize and try to get things tidied up as much as possible. Whenever icing, sprinkles, and kids are involved there is going to be some mess. That just goes with the territory. But it was loads of fun.

I would like to thank Publix for providing the cupcakes, cookies, and icing, and I especially want to thank Roundabouts Cupcake Sleeves for generously sending me enough cupcake wrappers so that everyone who decorated a cupcake had their choice of Valentine's Day themed sleeves, A Tisket, A Tasket, and Tickle the Ivories. I quickly ran out of the candy hearts, so it was the most popular design. I really wish I had pictures, because some of the cupcakes were really awesome.

I had to wait until I got home to take photos of my other display pieces. So, as promised, here they are. I think they held up pretty well considering I didn't so such a great job of packing them to bring back home, and I let people touch them. I also made a white color flow heart with smaller pink hearts on it, but the pink really bled into the white and looked awful, so I threw it away. I'm bummed that a string on the football laces broke off, but other than that these things stayed pretty much intact. I definitely like the laces positioned in the middle of the football as opposed to on the top edge, but I had to try both ways in order to see which would look better. I'm not so great at visualization.
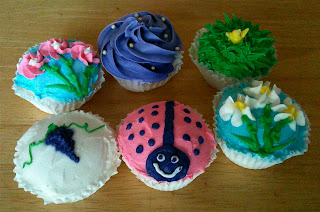
The cupcakes didn't turn out as well as I would have liked. I used some old Wilton rolled fondant to makes these, and they were way too heavy and took forever to dry. Next time I'll just spend the money and get some styrofoam balls or something more practical to use. I meant to pipe little pastel dots around the chick to make it look like he's sitting in a field of Easter eggs, but I forgot. Also, the dark purple grapes bled a little. I'm not sure why, as that's not an issue I've encountered before.
This is actually a cake board I decorated a while ago to put in the display case at the Rec center as an example of what students can learn in Buttercream Basics. Since I'm not scheduled to teach that class again until March, I swapped it out for the cake dummy I decorated to represent Buttercream Flowers. I wish his eye wasn't baby blue, as I think it looks kinda creepy. I should have made it black.
Since Valentine's Day is coming up, I had the obligatory hearts and love cake. Please pretend like you don't notice the dips on the top. They're not entirely my fault, as the styrofoam had some nicks and dips in it, but I still should have filled those in with royal icing before covering with rolled fondant.
I wanted to do a tablecloth cake, but I'm not entirely happy with the bottom border. I probably should've just piped simple beads, but I had already done that on the other two cakes and didn't want to be repetitive. Also, the roses aren't supposed to be a dingy grey color. I think some Nu Silver was left on my brush when I went to apply the Super Pearl. Oh, well. At least I used a better green for the leaves this time.
Here is my redux from this week's Should've Done Sunday. Yes, this cake was entirely inspired copied from my cake I did in the Fondant II class (as were the roses on the cake above). But nobody else knew that.

All in all, it was a great day, and tons of fun. Hopefully this week I'll get around to trying a recipe that's worth sharing.

Friday, January 14, 2011

Roundabouts Cupcake Sleeves: Giveaway for Valentine's Day

WOW! We had 133 entries in this giveaway, which is very impressive. Thank you to everyone for participating. I really appreciate it. The lucky number chosen by Random.org is...

Brooke Anna left comment number 94, so she's the lucky winner, congratulations! Thanks again to everyone who entered, and a HUGE thank you to Roundabouts Cupcake Sleeves for sponsoring this giveaway for you guys. They are a fantastic company to work with, and they have awesome cupcake sleeve designs.

Do you guys remember the Roundabouts Cupcake Sleeves giveaway I hosted late last year? Well, they are generously letting me host another one! This time the prize is a pack of their Cupcake Valentines design. These are Valentine's Day Cards made into cupcake sleeves. Or, I guess you could think of them as sleeves that transform your cupcakes into Valentines. Either way, how cool is that? These are perfect for playgroups, school parties, and really any occasion where you'd give a Valentine's Day card. Only you'll be giving cupcakes. Valentine's Day is only a month away, you know.

To enter the giveaway, first visit www.roundaboutsleeves.com and then leave a comment here telling me what other Roundabout Cupcake Sleeves design(s) appeal to you. They have a HUGE selection! This is the mandatory entry that must be done in order for any bonus entries to count.

Once you've done that, feel free to complete any or all of the following bonus entries, just be sure to leave a comment for each entry so it counts. Just like my other giveaways, the winner will be chosen by random.org based on comment number, which is how each comment equals an entry.
  • Follow @RoundaboutWraps on Twitter.
  • Like Roundabouts Cupcake Sleeves on Facebook.
  • Come up with your own original idea for a Roundabout Cupcake Sleeve design (they do custom orders, you know) and leave a comment here describing it.
  • Leave a comment on my Roundabouts Cupcake Sleeves review
  • Take my cake class survey: http://www.surveymonkey.com/s/379WGP8 (if you've already participated that still counts, just let me know in the entry comment)
  • Follow Darla's Cake Blog via Google Friend Connect.
  • Follow Darla's Cake Blog via Networked Blogs.
  • "Like" Darla's Cake Blog on Facebook.
  • Leave a comment on the Facebook page for Darla's Cake Blog.
  • Follow @cakedarla on Twitter.
  • Post a link to or "share" this giveaway on the social networking site of your choice (Facebook, CafeMom, etc) then leave a link to your post in the entry comment.
  • Tweet about this giveaway, and then leave a comment here with the tweet entry URL. You can use any wording you like, just make sure to include @cakedarla and a link to this blog post. You get one entry per tweet, but only one tweet entry per day, please. Example: Enter to win Roundabout Cupcake Sleeves from @RoundaboutWraps in @cakedarla's #giveaway: http://bit.ly/eb5DHw
This giveaway ends January 30th at 11:59 p.m. One lucky winner will be chosen at random from all the entries on January 31, 2011. If you're not on Twitter, Blogger, Facebook, or Google, please leave your email address in your comment so I can contact you. Winner will have 48 hours to claim the prize. Good luck!

Thursday, December 23, 2010

Christmas Cookies in 3-D

Remember the other day when I posted the snowflake cookies we made, and I said I'd talk about the other cookies later, when they were finished? Well, this is what else we made with that basic cookie dough. I have some stackable cookie cutter sets, and two of them are holiday-themed: a gingerbread man and a Christmas tree. These are a lot of fun. 
  
You use them just like other cookie cutters, then you have the option to decorate each piece and stack them for a 3 dimensional effect, like I did with the gingerbread men. I had more rolled fondant to decorate them with, and I used the same cutters to cut out fondant pieces to cover the cookies. For some reason, I was short a waistcoat and bow tie cookie, so the chocolate gingerbread man is a little flat.
These were made with the same white rolled fondant I used on the snowflake cookies, and I colored some of it blue and green. The red is actually cherry-flavored Fondarific, and the brown is chocolate Fondarific. This stuff is awesome, by the way. It's not the cheapest rolled fondant out there, but it's some of the best tasting, AND it comes pre-colored and in a large variety of flavors. The blue man's waistcoat I iced with buttercream then dipped in silver sprinkles. The green just didn't look right on him, and I thought he could use some sparkle. The eyes and noses are rainbow chip sprinkles, and the mouths are either more rainbow chips or shaped rolled fondant.
 
My kids decorated the trees and presents, and they did a fantastic job. We even have a green mini snowman (with arms) and a snake. I sense a smiley face theme this year. The yellow is lemon Fondarific, attached to the cookie with some buttercream I colored yellow.
 
Oh, and here are some stars and a few snowflakes that were left out of the other post. I have plans to make more stuff, and I'll try to keep my blog updated.

Wednesday, December 22, 2010

Gingerbread

Every year we decorate gingerbread. I let my kids pick out whichever pre-baked kit they want, because I tried doing the whole thing from scratch one year and swore I'd never do it again. You need a degree in engineering or architecture or something. Besides, since the kits include EVERYTHING you need and are only around $10 each, there's no way you could buy all the ingredients and other supplies for less than that. Sometimes we wait until Christmas Eve to do them, but this year we got an early start. In the past, we've had a house and a tree, but this year the store only had house kits left.
The gingerbread house pieces come shrink-wrapped to a board and enclosed in bubble wrap so they stay intact. You can use this board as the base to assemble your house. There is also slightly bigger cardboard inside the box, and I prefer to use that. I like to wrap it in freezer paper so it's white, and since the surface it slick, it's also easy to keep clean. The house consists of a front and back (the peaked walls), 2 short side walls, and 2 larger roof pieces.
  
The powered icing mix is super easy; all you do is add water. It's very similar to royal icing, only it tastes better and still dries very hard. Please be careful not to add too much water. The instructions say to use 5 tablespoons of warm water, and you may need to add more, especially if young hands are having to squeeze it out of a piping bag, but only add a little at a time. The icing won't be fluffy like buttercream, and it dries out very quickly, so keep it covered with a damp paper towel when not in use. That includes icing in a piping bag! You don't want it to dry in there and clog your tip.
  
You'll need to assemble the house and allow the icing to dry completely before decorating it. I find it easiest to pipe the icing along the gingerbread edges--sides and bottom--and then hold them in place until the icing starts to dry and they can stand up on their own.
  
 Once one peaked and one side wall are secure, you can add the others.
 
I like to add extra icing to the inside corners and bottom edges for reinforcement. I then take a spatula and tidy up the exterior seams and bottom edges by scraping off any excess icing that may have oozed out.
 
Once the walls are put together, it's a good idea to leave them for an hour or so before adding the roof. This makes sure the icing is dry and the whole thing is stable before adding weight to the top. When the icing holding the roof in place it totally dry, it's time to decorate!
  
This year, I bought some candy molds to make accessories for the houses like a welcome mat, windows, shutters, a door, landscaping, fence pieces, and chimney. I'm a sucker for cool candy molds, and candy melts are so easy to use, and available pre-colored. Of course, they're not "proper" chocolate, but you don't have to worry about tempering. Just melt and mold.
There are several different ways you can make candy using molds. I like to put the melts in a plastic disposable piping bag then zap the whole thing in the microwave until melted. I do intervals of 20 seconds, kneading the bag in between to help them melt evenly.
 
Then I snip off the bottom and squeeze the melted candy into the mold. To make multi-colored pieces, layer the candy by doing the front colors first, allow that to set, then add in any additional colors. Alternatively, if the accents are really small, you can use a small (food-safe) paint brush to apply the melted candy to the mold.
The candy pieces will set up faster if you let them chill in the refrigerator, and then they'll just pop right out of the molds. You can then attach them to the gingerbread with icing or melted candy.
 
For the chimney, I found it easier to use melted candy to assemble the 4 sides of it first, then stick it on the roof.
 
Here are the finished gingerbread houses. Just so you know, all I really did was help with the assembly and mold the candy pieces. My kids did the rest.