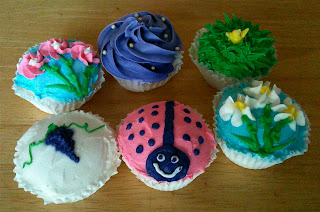
I haven't baked anything exciting lately, so I don't have a recipe to share, but I am going to show pictures of some display samples I've put together. These aren't difficult to make, but they have been somewhat time consuming and are the main reason I don't have a recipe to post. But don't worry, once I have all of these completed I'll get back to making edible stuff.
First, a little background: The craft store where I teach Wilton cake decorating classes has display pieces to represent the different Wilton courses offered. The idea is that customers see the display and are so inspired by the thought that they could learn how to make such awesome cakes, cupcakes, cookies, candy, or whatever, that they rush up to the cashier and register for class immediately. Or something like that. Well, the Wilton classes changed last summer when they launched their "refreshed curriculum," so that meant the old displays were no longer accurately representing the new courses. Plus, over time the samples had started looking pretty shabby, and some were damaged, so it was time to make replacements.
I'm not sure why I bothered rambling on about all that because I didn't think to take pictures of those display pieces before turning them in. Still, I'll tell you what I made. The other Wilton Instructor is taking care of the displays for the 4-week Wilton courses, so I made stuff for the project classes. I made a springtime/Easter cookie bouquet, which was actually very good practice, as I've scheduled a
Cookie Blossom project class for next month. I also made an assortment of decorated cupcakes to promote the Cupcake project class, which I plan to offer in March. (A bit of
shameless self-promotion there, sorry.)
Now, using real cupcakes and cookies for something like this isn't a good idea. Cookies go stale and crumble, and the cupcakes go all moldy and nasty after a while, assuming they don't fall apart first. I made the "cookies" out of cardboard by tracing around some shaped cookie cutters and cutting out the pieces. After the holidays, there's no shortage of spare boxes lying around this house, believe me. Styrofoam balls are a great option for cupcakes, but I didn't have any. Since I was providing my own supplies for these, I had to go with what I had on hand to avoid any out-of-pocket expense. I'm cheap that way.
I had a few boxes of
Wilton rolled fondant in my cupboard that I really needed to use up. Nobody in my family will eat it anyway, and it had been around for a while. I just balled up some fondant, and then I pressed it into the cavities of a muffin pan, thereby molding it into a cupcake shape. Once dry, I hot glued a paper baking cup to it, and it's a cupcake dummy. (As in it's a dummy/fake cupcake, not "It's a cupcake, dummy." That would be rude.) Now, the fondant is considerably heavier than using styrofoam, and that presented its own problems, but I won't bore you with all that, especially since I don't have photos of them anyway.
While I was getting the above done, I was also working on some display samples for my cake decorating classes at the Rec center. They're having this big "
Art Sparks" event in a couple of weeks, and all the arts and crafts instructors are eligible to participate, which is supposed to help generate interest in our classes and boost enrollment. I'll be there with some cookies and cupcakes for the public to decorate with icing and sprinkles (all courtesy of a local grocery store). It's actually going to be loads of fun because
Roundabouts Cupcake Sleeves sent me some super cool sleeves to use on the cupcakes, so they're going to look awesome.
Anyway, I need pieces that represent what students learn in my classes. I offer quite a few classes, so that means cookies, cupcakes, buttercream cakes, and examples of fondant-decorated cakes. The cupcakes and cookies were easy enough, as I made some while I was working on the others for that-craft-store-I-won't-name. I haven't actually decorated the cupcake dummies yet, but here are the cookies:
Imagine them (minus the hearts) on sticks and artistically arranged in a make-shift flower pot, and that's what the cookie bouquet looked like. These are really easy and so much fun. Just use your
cookie cutters to cut out a perfectly fitting piece of fondant, in whatever color you wish, and use a little icing to attach it to the cookie. That's all I did for the tulips, except I hot glued it, which is why the surface looks a little bumpy.
The duck I did the same way, and then when the fondant was dry I used a
black food marker to add an eye. I marbled some pink and blue fondant (by not thoroughly mixing the two colors together) for the butterfly, then drew on the details with a black food marker. For the Easter eggs, I just cut narrow strips of fondant using the zig-zag wheels on my
Ribbon Cutter Embosser tool, and attached them to the top with a little water. The bunny's ears were made using a small leaf cutter, I free-handed his nose, and drew his face with the trusty
black food marker.
For the hearts, I used a smaller heart cutter (helps if you have a
nesting set) to cut out the center piece, and I frilled the edges with a
veining tool, trying to make it look like lace or a doily or something. On the bigger piece, I took a very small
blossom cutter to make the eyelets.
I recently ordered some styrofoam cake dummies, but while I'm waiting for those to arrive I decided to go ahead and decorate some cake boards. The rolled fondant class I offer just covers the basics for beginners, so nothing complicated here. The fish are made with a fish-shaped cookie cutter and yellow fondant, then I took a
veining tool and added the lines on the fins and tails. The scales I made with a tiny round cutter, but the wide end of a piping tip would work just as well. The eye are little pieces of white fondant with a black dot, made with a food marker. I used an
impression mat to get the embossed texture on the blue fondant. So much of this type of cake decorating is merely a matter of having the right tools for the job.
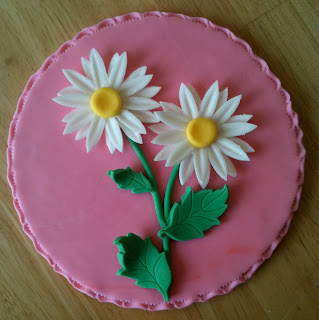
Daisies are fun because they're quick and easy. All you need is a
daisy-shaped cutter, and a veining tool to make a line down the middle of each petal. Then flatten a small ball of yellow fondant for the center (can attach with water or clear alcohol), roll a thin snake for the stems, and cut some leaves. For these, I used my
Leaf Cut and Press set. It cuts and embossed the veins on leaves at the same time. Oh, and I used an S-shaped
crimper around the edge there.
Ah, yes, of course. The obligatory package cake. These are still really popular so I had to do one. I think I went a bit overboard with the texturing, but I had all my fun tools out (well, the
cake decorating ones, anyway) and got carried away. The only thing about a cake like this is making all the bow loops in advance. They really need to be dry and set before placing them. All you do is cut strips of fondant, attach the ends together--most of the time just pinching it does the trick, if not use clear alcohol or water, and then set them up on one edge so that they dry with their loops open. Before cutting these bow loops, I pushed my
spiral rolling pin over the fondant. I used another
impression mat to emboss scrolls on the yellow fondant, and I cut the ribbon with my
handy little cutter tool, using the quilting wheel attachment to emboss the stitched look along the sides.
Since my rolled fondant had been sitting in the cabinet for a while, it wasn't all that easy to work with. You can see here where it's cracking just from being folded over cake board edge. I rarely have this issue with
other types of fondant, but those brands are more expensive, not to mention actually worth eating, so I used the Wilton stuff. I'm actually required to use it for the Wilton class samples, for obvious reasons, and it was all I had on hand.
I'll post more photos of the cupcakes and buttercream-decorated cake samples when I have them done. I'm actually really looking forward to making them. I've certainly enjoyed working on these.


